
Sometimes you just want that perfect balance: a crust so crisp you can hear it, and an inside so airy it almost floats. Italian Ciabatta Bread gives you exactly that—a rustic loaf with golden edges and a chewy, bubbly crumb. It’s one of those breads that feels fancy but fits into any kitchen, whether you’re making a casual panino or just craving something to dunk into peppery olive oil.
When I make ciabatta, my house smells like a bakery in full swing—warm, inviting, and slightly nutty as the loaf comes out of the oven. This recipe keeps things as traditional as possible, letting the simplicity of flour, water, yeast, and salt shine. If you’ve been searching for a foolproof Italian Ciabatta Bread that’s loaded with those iconic air pockets, you’re in for a treat.
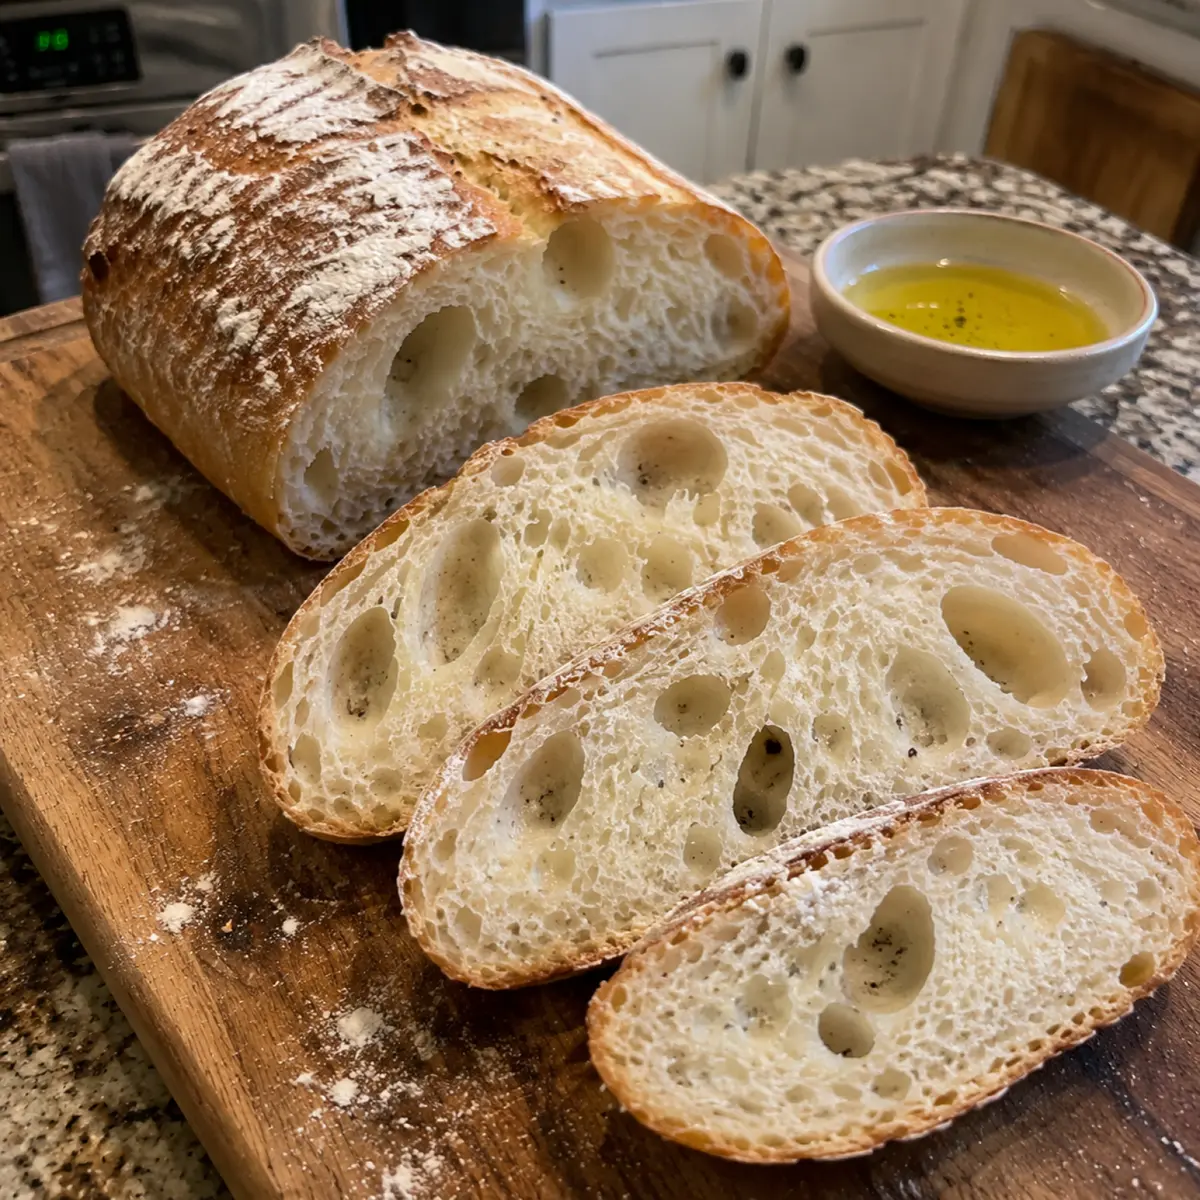
What Makes Italian Ciabatta Bread Irresistible
There’s a simple joy in tearing into a loaf of Italian Ciabatta Bread, feeling that crisp crust give way, and watching steam escape from the pillowy center. The flavor is subtle yet deeply comforting—yeasty, just a touch nutty from the flour, and with a texture that’s both chewy and light as air. Each slice practically begs to be paired with your favorite toppings or just enjoyed plain, warm out of the oven.Homemade ciabatta stands out for its dramatic holes (those signature “alveoli”) and deeply golden, rustic look. No two loaves are ever quite the same, but that’s part of the charm. It’s surprisingly easy to make, even if you don’t have much bread experience. Once you’ve tasted your own fresh-from-the-oven ciabatta, store-bought just won’t cut it anymore.
The Essential Ingredients for Italian Ciabatta Bread
You don’t need a long shopping list—just a few pantry basics. Each ingredient plays an important role in creating ciabatta’s iconic crust and texture.- Bread flour – The high protein content helps develop that chewy texture and open crumb. Sifting gets rid of any lumps, making it easier to mix.
- Salt – Essential for flavor and also helps control yeast activity.
- Instant yeast – Gives the dough a reliable rise and those beautiful, airy bubbles.
- Warm water – Hydrates the dough and helps the yeast activate. The “wetter” dough is what makes those signature holes possible.
- Olive oil (optional, for greasing) – Helps prevent sticking and adds just a hint of richness if you use it for greasing.
See the recipe card below for the full list of ingredients and measurements.
Step-by-Step: How to Make Classic Ciabatta
Baking Italian Ciabatta Bread is all about patience and gentle handling—no kneading needed. Here’s how you can achieve that signature structure in your own kitchen:- Combine the bread flour, salt, and yeast in a large mixing bowl, stirring just until everything is evenly distributed.
- Pour in the warm water and use a spatula or wooden spoon to stir. You want a very sticky, shaggy dough at this stage. Cover the bowl and let the dough rest for a bit (this allows the flour to hydrate and gluten to start forming).
- Stretch one side of the dough up and fold it over toward the center. Turn the bowl and repeat this stretching and folding on all four sides. Cover and let it rest. Go through this gentle folding process two more times, letting it rest in between each to develop that beautiful structure.
- After all the folds, cover the dough and let it rise until doubled. You’ll start to see big bubbles under the surface—this is what gives ciabatta that open crumb.
- Turn the dough out onto a generously floured surface. Skip the urge to punch it down; instead, handle it carefully and shape it into two rough rectangles. The goal is to keep as much air in the dough as possible.
- Move the loaves to a parchment-lined baking sheet. Give them one last short rise as they puff up a bit more.
- Preheat your oven. If you like an extra-crisp crust, place a tray of hot water on the oven floor when you start baking—it’ll create steam that helps the crust develop.
- Bake until the loaves are deeply golden and sound hollow when tapped. You’ll smell that irresistible, toasty aroma filling your kitchen.
- Cool the bread on a wire rack. This keeps the crust crisp and ensures the inside stays tender and airy. Wait for it to cool before slicing—if you can!
Tricks for the Perfect Ciabatta Texture
Ciabatta is famously all about that contrast between the crisp crust and the chewy, holey interior. Getting there isn’t hard, but a few simple tricks make a big difference.- Use a “wet” dough: the stickier the dough, the better the holes. Don’t add extra flour as tempting as it might be.
- Handle with care after rising. Avoid punching the dough down—just coax it into shape to save those air pockets.
- Let the dough fully rise and go by look: when it’s doubled and you see big, uneven bubbles, you’re ready for shaping.
- Bake on parchment for easy removal and a nice bottom crust. A preheated baking stone, if you have one, takes it up a notch.
- Cool completely before slicing to keep the crumb springy—not gummy.
If your bread turns out dense, it’s often due to adding too much flour or deflating the dough while shaping. Keep a gentle touch and trust that sticky dough is worth the effort!
Ways to Serve and Enjoy Ciabatta
Italian Ciabatta Bread shines in all sorts of meals—from breakfast toast to dinner sides. Here are a few delicious ideas:- Slice and grill for crostini, then top with tomatoes, herbs, or goat cheese.
- Dunk thick slabs into peppery extra-virgin olive oil for a simple starter.
- Layer with cold cuts, fresh mozzarella, and roasted vegetables for the ultimate sandwich.
- Turn leftover slices into rustic garlic bread—brush with olive oil and toast under the broiler.
- Pair with classic Italian dishes like soups, salads, or pasta for a bistro-style meal at home.
This bread is all about versatility, so don’t be afraid to experiment or just enjoy it warm with a swipe of good butter.
Keeping Your Ciabatta Fresh
Ciabatta is best the day it’s baked, but you do have options if you need to store it. Once completely cooled, wrap the bread loosely in paper or a clean towel—this keeps the crust somewhat crisp while preventing it from drying out too quickly. Avoid plastic, which softens the crust.For longer storage, you can freeze ciabatta: slice it first for easy toasting, then wrap well and stash in an airtight bag. Thaw at room temperature and reheat briefly in the oven to revive the crust. Avoid refrigerating, as this can make the bread stale faster.
FAQs about Italian Ciabatta Bread
Can I use all-purpose flour instead of bread flour for ciabatta?
You can try, but your ciabatta won’t have the same chewy structure or large holes. Bread flour’s higher protein is key for the best texture.
How do I know when my Italian Ciabatta Bread is done baking?
The loaves should be deep golden and sound hollow when tapped on the bottom. The crust will feel very crisp while the inside stays soft.
What’s the best way to store leftover ciabatta?
Store completely cooled bread wrapped in paper or a clean towel at room temperature. For longer storage, slice and freeze your ciabatta.
Why did my ciabatta turn out dense instead of airy?
The most common reasons are adding too much flour or handling the dough too firmly after rising. A sticky dough and gentle shaping keep it light and holey.
Bring the Warmth of Italy to Your Table
There’s truly nothing like tearing into a fresh loaf of Italian Ciabatta Bread that you made yourself. Each golden slice is crisp on the outside, tender and full of air pockets inside—perfect for sharing or keeping all to yourself. Whether you dip, sandwich, or snack, this bread delivers the bakery experience at home. Enjoy the aroma that fills your kitchen and the satisfying sound of that first crunchy bite.What To Try Next
Keep the Italian vibe going or complement your bread with these tasty ideas.
- Stuffed Tomatoes — fresh tomato flavors pair beautifully with homemade ciabatta bread.
- Ham Egg and Cheese Breakfast Quesadillas — a great next step if you want a delicious handheld breakfast.
- Strawberry Spinach Salad — adds a light, refreshing contrast to your hearty homemade bread.
Recommended Equipment

Lodge Wanderlust Cabin Cast Iron Combo Cooker
Ideal for baking Italian ciabatta bread
View on AmazonDouble Waffle Maker for Classic Waffles
Used for rolling dough for Italian ciabatta bread
View on Amazon
* As an Amazon Associate, I earn from qualifying purchases. There is no extra cost to you.

Traditional Italian Ciabatta Bread Recipe
Ingredients
Method
- In a large bowl, mix the bread flour, salt, and yeast together.
- Add the warm water and stir until you get a sticky dough. Cover and rest for 30 minutes.
- Stretch one side of the dough and fold it over. Repeat on all four sides. Cover and rest for 30 minutes. Repeat this folding process two more times, resting 30 minutes in between each.
- After the final fold, cover the dough and let it rise for 1½ to 2 hours, or until it doubles in size.
- Turn the dough out onto a floured surface. Don’t punch it down. Gently shape into two rough rectangles.
- Place the loaves on a baking sheet lined with parchment paper. Rest for 30–45 minutes.
- Preheat oven to 450°F (230°C). Optionally, add a tray of hot water to the oven to make steam.
- Bake for 20–25 minutes, until the loaves are golden and crisp.
- Cool on a wire rack before slicing.