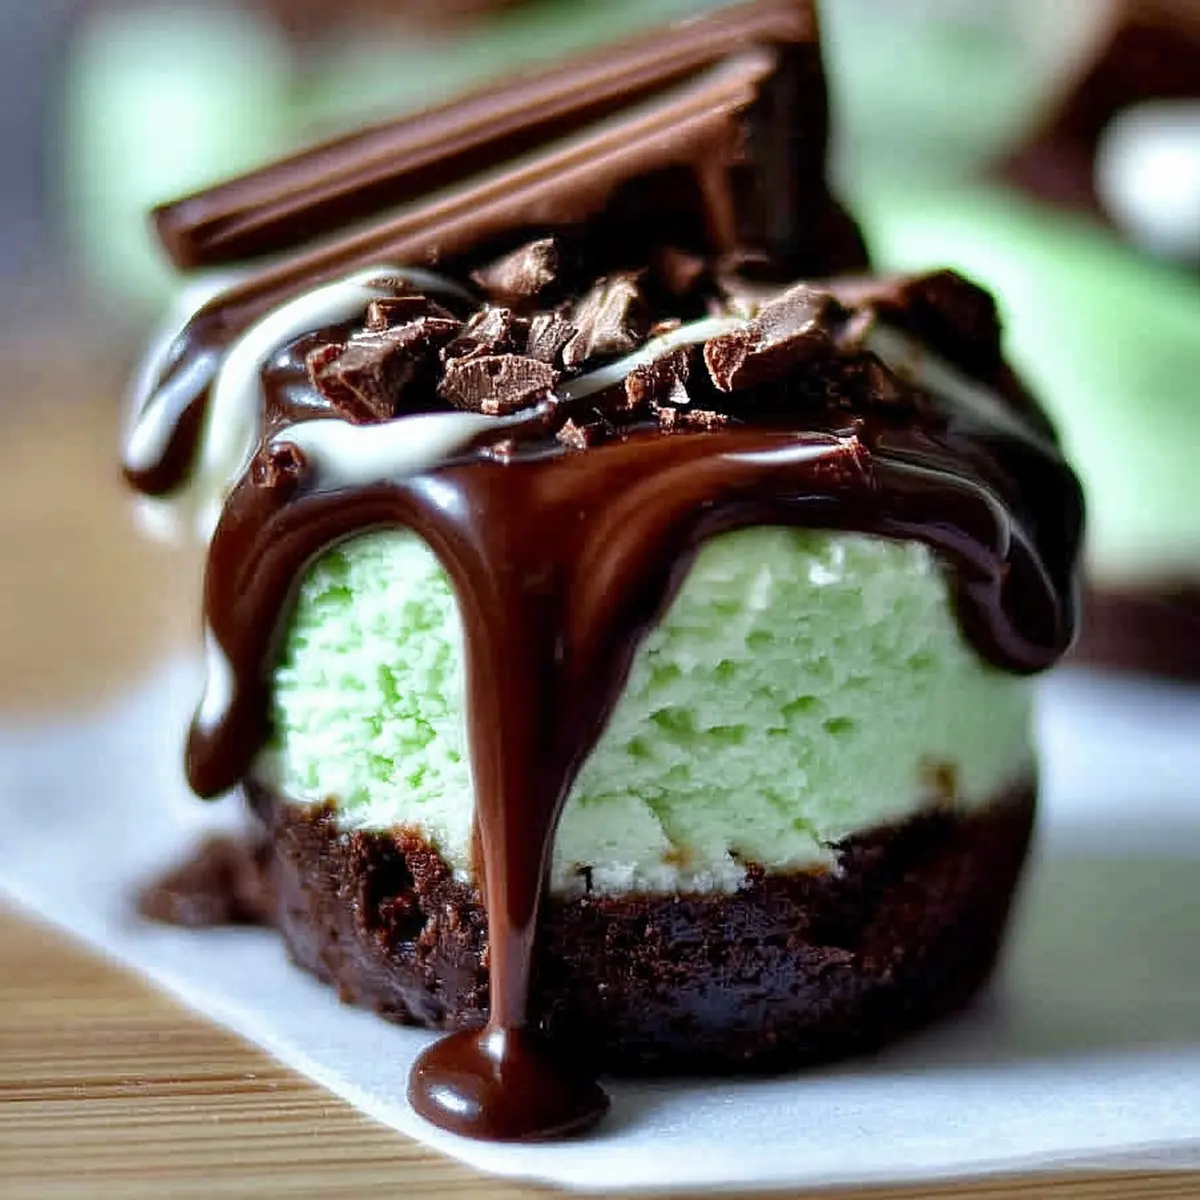
If you’ve ever wanted a crowd-pleasing dessert that’s both incredibly cute and delivers on flavor, Andes Mint Mini Cheesecakes are about to become your new favorite. I first brought these to a neighborhood holiday party and, honestly, people could not stop talking about that delicious mint-chocolate combo. It’s that perfect bite-sized treat: velvety cheesecake meets refreshing mint, tucked onto a chocolate graham cracker crust and finished with a glossy chocolate layer and sprinkles of real Andes mints.
Making mini cheesecakes always reminds me of playing with building blocks as a kid—layer by layer, each with its own personality. The cool mint aroma hits first, followed by the creamy middle, and then there’s that rich chocolatey snap on top. These Andes Mint Mini Cheesecakes look almost too good to eat—almost.
Why These Andes Mint Mini Cheesecakes Are So Addictive
Some recipes just have that “gone in a flash” magic, and Andes Mint Mini Cheesecakes absolutely fall into that category. These little bites are creamy, cool, and utterly satisfying, with that one-two punch of chocolate and mint you crave at the end of a meal (or, let’s be honest, mid-afternoon).
They’re basically foolproof for parties—easy to serve, no messy slicing, and everyone feels like they’re getting their own special dessert. The chocolate graham cracker crust adds a bit of crunch, while that minty cheesecake filling feels both classic and fresh. And let’s not ignore the topping: a generous drizzle of melty chocolate with chopped Andes candies means you get that signature flavor in every bite.
Even better? These cheesecakes freeze beautifully, so you can make them ahead for holidays or just keep a stash for those “I-need-something-sweet” moments. Whether it’s a St. Patrick’s Day treat, a winter holiday showstopper, or a summer potluck favorite, they just work.
The Essential Ingredients for Andes Mint Mini Cheesecakes
Let’s break down what goes into these decadent mini cheesecakes—each piece brings something special to the party.
- Nonstick baking spray – Makes it painless to remove these cheesecakes from the pan, keeping the crust intact and the edges pretty.
- Chocolate graham cracker crumbs – The toasty, chocolatey foundation that gives structure and crunch under the creamy filling.
- sugar – Essential for sweetening both the crust and the cheesecake heart. It also helps everything meld together for that smooth mouthfeel.
- Butter, melted – Binds the crumbs and brings rich flavor to the base. Use unsalted if you want a little more control over the sweetness.
- Cream cheese, softened – The star of the show, lending velvety texture and that tangy, classic cheesecake taste.
- Egg – Holds the filling together for that just-firm-enough texture, without any toughness.
- Mint extract – Adds that cool, unmistakably minty flavor reminiscent of the iconic Andes mints.
- Green food coloring – Optional, but adds the soft, delightful green hue that hints at mint before you even take a bite.
- Chocolate chips – Used for the topping layer, they melt into a glossy, fudgy crown that pairs perfectly with the mint filling below.
- Andes mints, chopped – The finishing touch! A sprinkle of these unmistakable candies adds color, crunchy texture, and bursts of real mint-chocolate flavor.
See the recipe card below for the full list of ingredients and measurements.
Step-by-Step Guide to Making Andes Mint Mini Cheesecakes
Making Andes Mint Mini Cheesecakes is much simpler than it looks, promise. Here’s how you’ll layer, bake, and dress them up for their moment in the spotlight:
- Start by preheating your oven and prepping your mini cheesecake pan with a good coat of nonstick spray. This tiny step is one of those things you’ll thank yourself for when it’s time to pop the cheesecakes out later.
- In a bowl, mix up your chocolate graham cracker crumbs, a bit of sugar, and melted butter until all the crumbs look glossy and stick together when squeezed. Scoop this mixture into each well of your pan and press it down gently with the back of a spoon to create a firm, even base.
- In a stand mixer (or with a hand mixer), blend softened cream cheese with a touch more sugar until you get a glossy, lump-free mixture. Add the egg, mint extract, and a few drops of green food coloring. Let everything whip together on low speed just until blended for that light-as-air filling.
- Spoon the creamy mixture over each chocolate crust, smoothing the tops so they’ll bake up evenly. You want that gentle green color to peek through but not spill over.
- Bake until the centers are just set and barely jiggle. Once done, turn off the oven, prop the door open with a wooden spoon, and let the cheesecakes cool gently—this helps avoid cracking and gives the filling a dreamy texture.
- Chill the cheesecakes for several hours or overnight. Waiting is tough, but this step is key to a clean release and set, creamy centers.
- Just before serving, melt chocolate chips in the microwave until silky smooth. Dollop a spoonful over each mini cheesecake and immediately top with a scatter of chopped Andes mints. Let the chocolate set for just a minute or two—or dig in while it’s still a little warm for ultimate decadence.
Top Tips to Nail Andes Mint Mini Cheesecakes Every Time
Mini cheesecakes can be incredibly forgiving, but a few little details make all the difference. Here’s what I’ve learned making Andes Mint Mini Cheesecakes for everything from classroom parties to family dinners:
- Always let your cream cheese soften fully before mixing. Cold cream cheese stays lumpy, and nobody wants chunks in their otherwise dreamy filling.
- Don’t over-mix after adding the egg. Blend just until incorporated. Overmixing can lead to puffed (then collapsed) cheesecakes.
- Press your crust down firmly but not too hard. You’re looking for a base that holds together yet isn’t rock solid.
- To keep the vibrant green color, use gel food coloring for a pop that actually shows up after baking.
- Chill your cheesecakes completely before removing them from the pan. A little patience means picture-perfect edges and a creamy interior every time.
- For silky chocolate on top, melt chocolate chips slowly in short microwave bursts, stirring well to prevent scorching.
- Freeze any extras on a lined tray, then transfer to a sealed container—now you’ve got an instant, stress-free dessert for unexpected guests or your own late-night sweet tooth.
Serving Ideas and Creative Variations for Andes Mint Mini Cheesecakes
Andes Mint Mini Cheesecakes are fun to serve and easy to customize depending on your mood or the season. Here’s how to keep things interesting:
- Garnish with fresh mint leaves or a sprinkle of crushed chocolate cookies for a little extra color and crunch.
- Serve alongside a scoop of vanilla or mint chip ice cream for a showstopping dessert plate.
- For kids (or the kid-at-heart), add a swirl of whipped cream and a cherry on top.
- Make holiday-themed versions: red and green sprinkles for Christmas, gold dust for New Year’s, or pastel mints for spring parties.
- Swap the chocolate graham crackers for classic or even cinnamon graham crackers if you want a twist on the base.
- Try drizzling a bit of caramel or white chocolate over the top for a different flavor (just before you add the Andes mints).
- These keep wonderfully in the freezer, so double up on your batch and thaw as needed—perfect for last-minute sweet cravings or gifting.
FAQs about Andes Mint Mini Cheesecakes
Can I freeze Andes Mint Mini Cheesecakes?
Absolutely. Andes Mint Mini Cheesecakes freeze very well. Place them on a baking sheet to freeze solid, then store in an airtight container for up to a couple of months. Thaw in the fridge overnight before serving for best texture.
What can I use instead of chocolate graham crackers for the crust?
You can swap in regular graham crackers, chocolate wafer cookies, or even digestive biscuits for a slightly different flavor. The key is to crush them finely and blend with melted butter so the base holds together.
Do Andes Mint Mini Cheesecakes need to be refrigerated?
Yes, these cheesecakes should always be kept chilled. After baking and cooling, store them in the refrigerator until ready to serve. They’re best enjoyed cold for that creamy, dense filling and to keep the chocolate topping nice and firm.
How far ahead can I make Andes Mint Mini Cheesecakes?
You can make Andes Mint Mini Cheesecakes a day or two in advance. Just prepare and chill as directed, then add the chocolate topping and Andes mints shortly before serving if you want the chocolate to have that perfect, glossy look.
When you want a dessert to wow—and disappear—at every gathering, Andes Mint Mini Cheesecakes will always be your winning ticket. That rich, minty cheesecake tucked onto chocolate crust and topped with creamy chocolate and real Andes? It’s pure joy in a tiny package. Serve chilled with coffee, hot cocoa, or just devour straight from the fridge for a cool, indulgent treat.
More Delicious Recipes
- St. Patrick’s Day Chocolate Guinness Bundt Cake with Stout Glaze: This rich chocolate cake incorporates Guinness for a unique flavor, making it a perfect complement to the minty notes of Andes Mint Mini Cheesecakes.
- St. Patrick’s Day Brownie Trifle: Layers of brownies and creamy fillings bring indulgence, perfect for fans of sweet treats during celebrations.
- St. Patrick’s Day Mint Blossom Cookies: These delightful cookies add a minty twist, matching well with the Andes mint flavor profile in the cheesecakes.
Andes Mint Mini Cheesecakes
Ingredients
Equipment
Method
- Preheat oven to 325 degrees and spray the mini cheesecake pan with nonstick baking spray.
- Combine graham crackers, 2 tablespoons of sugar, and butter. Divide in the mini cheesecake pan evenly. Press down gently with a spoon.
- In a stand mixer, blend cream cheese and 1/4 cup plus 2 tablespoons of sugar until smooth and creamy. Add the egg, mint extract, and food coloring: mix just until incorporated on low. Spoon the cream cheese mixture over the chocolate graham crackers, dividing evenly.
- Bake for 20 minutes. Turn off the oven, prop open the oven door with a wooden spoon, and allow the cheesecakes to cool down slowly for only about 5-10 minutes, then remove them from the oven.
- Remove from oven and chill for several hours or overnight before removing from pan.
- Melt chocolate chips in the microwave according to the manufacturer's instructions. Top each mini cheesecake with a heaping tablespoon of chocolate and a few pieces of Andes mints.