If you’ve been craving Starbucks Cake Pops but can’t justify standing in line or paying those coffee shop prices, you’re not alone. Honestly, I used to think cake pops were this mysterious, bakery-only treat—until a last-minute birthday party emergency had me scrambling for something fun and festive. Let’s just say these sweet, dense little orbs saved the day and made me rethink just how easy DIY desserts can be.
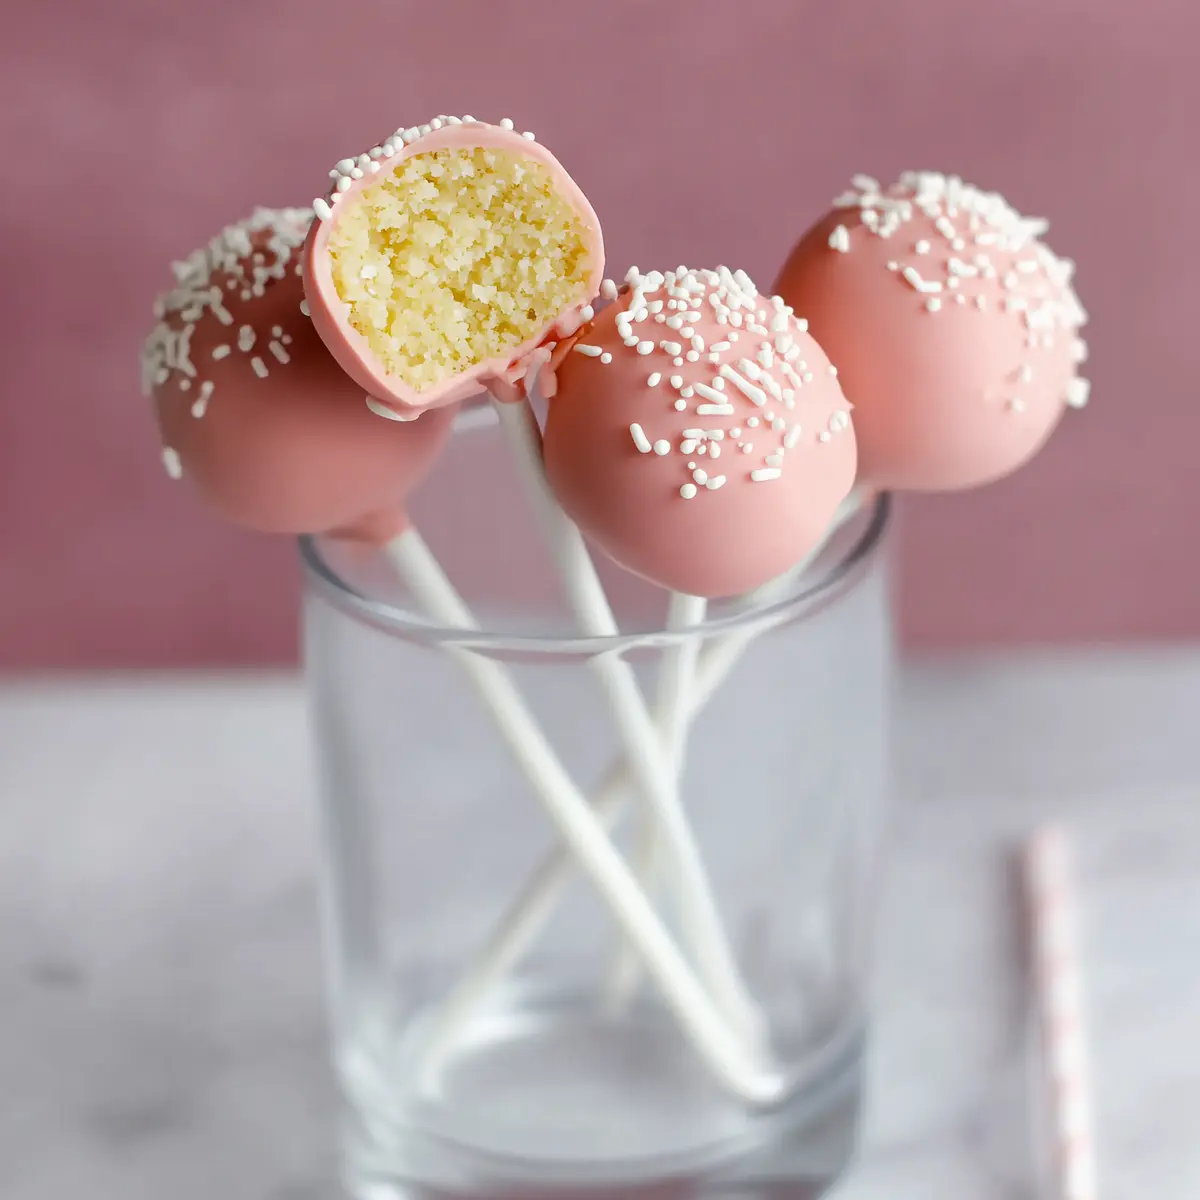
The lure here is all about that ultra-moist, creamy center wrapped in a crisp candy shell and topped off with playful sprinkles. While the original Starbucks Cake Pop might feel like a splurge, this homemade version is simple to pull off and a lot friendlier on your wallet. Plus, you get to control the flavors and colors—win-win.
Why You’ll Love These Copycat Starbucks Cake Pops
There’s a certain joy in making your own Starbucks Cake Pops at home. These little treats are a nostalgic blend of vanilla cake, creamy frosting, and a crisp, candy-dipped shell—finished off with just the right amount of sparkle.
Not only do they come together quickly with pantry-friendly ingredients, but you’ll avoid that classic bakery markup. They’re perfect for birthdays, showers, bake sales, or any moment that calls for a playful, hand-held dessert. Kids love helping shape and dip them, and grown-ups secretly love them just as much.
What makes these homemade cake pops even better than the originals? You can get creative with colors, decorations, and flavors, transforming your kitchen into your own mini bakery. Plus, making a batch feels a lot more fun than standing in line waiting for your name to be called.
Inside the Starbucks Cake Pop: The Simple Ingredient Breakdown
You don’t need anything fancy to create a bakery-worthy Starbucks Cake Pop. Here’s what goes into each bite:
- – cake mix: forms the tender, flavorful base you’ll crumble up for that classic cake pop texture.
- – French vanilla frosting: adds creaminess and helps the crumbed cake stick together into those perfect poppable balls.
- – Light pink candy melts: provides the signature glossy exterior and a sweet crunch with every bite.
- – White sprinkles: finishes the pops with a playful, bakery-inspired touch of texture and color.
See the recipe card below for the full list of ingredients and measurements.
Swap It, Top It: Cake Pop Ingredient Inspiration
Not feeling classic vanilla? You can swap in chocolate cake mix, red velvet, lemon, or even your favorite funfetti for a twist on that Starbucks Cake Pop flavor. If you’re dairy-free, look for a plant-based frosting, or try a homemade coconut-cream version for something different.
Candy melts come in every color under the sun, so feel free to pick hues that match your party theme or just your mood. Don’t have sprinkles? Mini chocolate chips, crushed nuts, or a dusting of edible glitter all make fun toppers. And while pink coating is the Starbucks signature, white or pastel shades work beautifully too.
How to Make Starbucks Cake Pops at Home: Step-By-Step
Here’s how you’ll bring those bakery vibes into your own kitchen, without the fuss:
- Bake the cake: Prepare your cake mix just like you would for a regular sheet cake, following the directions on the box. Once it’s done, let the cake cool until it’s easy to handle—it should feel soft but not sticky.
- Crumb and mix: Break up the cooled cake with a fork or your hands until you have fine crumbs. Stir in a scoop of creamy frosting. You’re aiming for a rich, doughy texture that holds together when squeezed but isn’t too wet.
- Shape: Roll the mixture into even balls, pressing gently to create a smooth, fudge-like texture. If the mixture is sticky or hard to shape, chill it in the freezer until it firms up, then try again. This helps achieve cake pops that are perfectly round and not crumbly.
- Stick it: Melt a little pink candy coating, then dip each lollipop stick about 1 cm deep before inserting it into a cake ball. This anchors the stick and keeps the pop secure as you finish them off.
- Dip and decorate: Once all your pops are firmly stuck and chilled, dunk each one into glossy melted candy melts, swirling to fully coat the outside. Let excess drip off, then set the pop upright on a styrofoam block or in a box. Scatter on white sprinkles before the coating dries.
- Set and share: Allow the cake pops to fully set until the coating is crisp and candies are locked in. Then they’re ready to serve, share, or stash away for a party—or a personal treat stash for the week.
Pro Tips for the Best Cake Pops
For cake pops that look and taste like they’re straight from a café, start with fully cooled cake before crumbling—warm cake makes for a gloopy mess. If the filling is too sticky to shape, a quick chill in the freezer works wonders and leads to pops with smooth, glossy edges.
When dipping, let the excess coating drip off by gently swirling the pop over the bowl. If you’re short on styrofoam, try poking holes in a sturdy cardboard box to hold your pops upright while they set. Store finished pops in an airtight container at cool room temperature for a day or two, or in the fridge if your kitchen runs warm.
For make-ahead magic, you can freeze undecorated cake balls for several weeks. Just defrost in the fridge and coat them when you’re ready to decorate—a lifesaver for party prep.
Pairings and Variations to Try With Your Cake Pops
Starbucks Cake Pops feel right at home on a dessert platter next to brownies, cookies, and bite-sized lemon bars. Pair them with hot coffee, an iced latte, or kid-friendly milk for an afternoon treat.
Switch things up by dipping the cake balls in dark or white chocolate melts for a different flavor experience. Add a surprise filling—a spoonful of berry jam or cookie butter inside before rolling for extra fun. If you’re hosting a brunch or baby shower, line up an array of pops in mismatched colors and let everyone pick their favorite.
Want to save a batch? These cake pops keep well in the fridge for several days and can be packed for lunchbox treats or party favors.
FAQs about Starbucks Cake Pop
Do I need a cake pop maker to make Starbucks-style cake pops?
You don’t need any special equipment for these copycat cake pops. Just bake the cake in a regular pan, crumble, mix, roll, and dip—no cake pop maker required.
Why are my cake pops falling apart or cracking?
Cracking usually happens because the cake balls are too cold or the candy coating is too hot when dipping. Chill your pops until just firm, let your coating cool slightly before dipping, and avoid freezing right before dipping for the best texture.
Can I use homemade cake and frosting for these cake pops?
Absolutely! Homemade cake and frosting work beautifully for Starbucks Cake Pop recipes. Just make sure the cake is on the moist side and the frosting is creamy for the best, fudgy bites.
How long do cake pops stay fresh?
Cake pops last up to a week when stored in an airtight container in the fridge. If you want to make them further ahead, store undecorated cake balls in the freezer and dip them right before serving.
Final Thoughts on Starbucks Cake Pop
These playful Starbucks Cake Pops are the perfect excuse to bring a little coffee shop magic into your own kitchen. With just a few simple ingredients and some creative energy, you’ll end up with a tray of sweet treats that look every bit as fun as those on the display counter—only made by you.
The best part? Cake pops invite customization, creativity, and plenty of smiles, making them an irresistible project for bakers of all ages. Once you’ve tried this version, don’t be surprised if people start asking for your “secret” cake pop recipe at every celebration.
More Delicious Recipes
- St. Patrick’s Day Brownie Trifle: This rich dessert combines layers of brownie and cream, perfect for pairing with your cake pops at a party.
- Green Velvet Cupcakes with Cream Cheese Frosting: These festive cupcakes make a great addition to any dessert table alongside your homemade cake pops.
- St. Patrick’s Day Chocolate Guinness Bundt Cake with Stout Glaze: A richly flavored bundt cake that complements the sweetness of cake pops beautifully.
Starbucks Cake Pop Recipe (Easy Copycat)
Ingredients
Method
- Start by preparing your cake by packaged directions. Beat cake mix, water, oil, and eggs in a bowl. Pour the batter into a greased 9x13-inch baking dish or two 8x8-inch round cake dishes and bake in a 350 degree F oven until a toothpick inserted into the center comes out clean.
- Let the cake cool completely, then crumble it with a fork in a large bowl or in the baking dish. Stir the frosting into the crumbled cake, cover, and freeze until chilled.
- Use your hands to roll the mixture into evenly sized balls. Freeze again until balls are hard. It’s easier to roll the cake & frosting mixture into perfectly round balls if it’s cold. The cake & frosting mixture is super moist, and at room temperature it makes it extremely difficult to shape them perfectly. Once they have been frozen, I give them another little roll to smooth out the sides. Then place on a baking sheet.
- Melt candy melts in the microwave or in a double boiler. Dip each lollipop stick into the pink chocolate, then stick into one of the cake pop balls. Do this with all of them and put back in freezer till they are solidified.
- Gently dip the balls into the melted candy melts or spoon it onto balls and twirl to coat. Decorate with sprinkles if desired. Place them upright in a styrofoam block, or a box to harden. There you have it, you have easy cake pops!