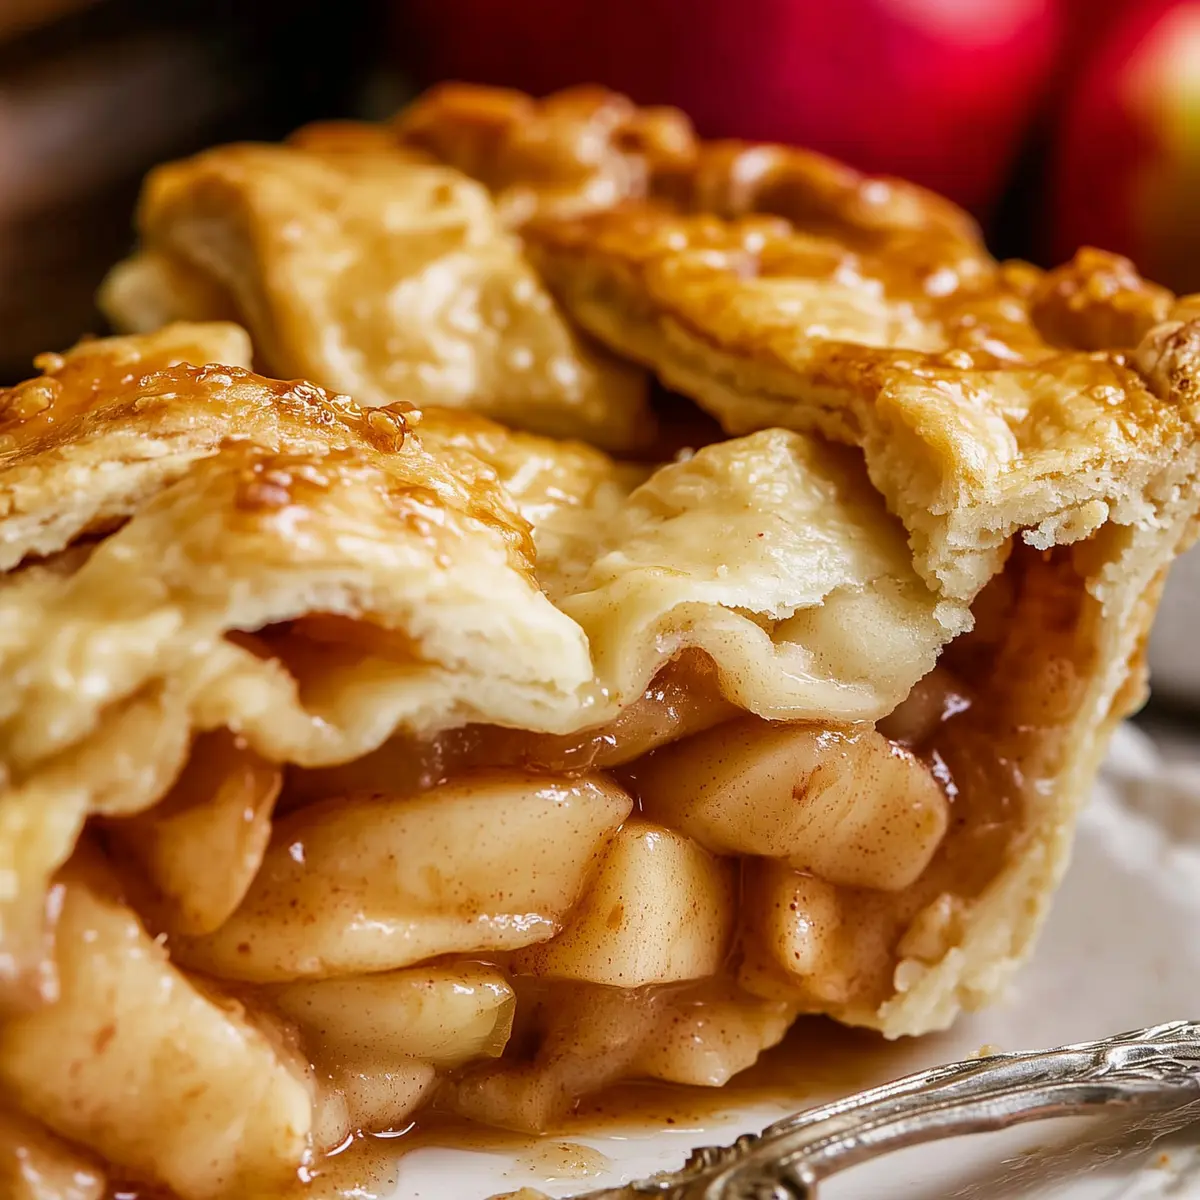
There’s something about a good Apple Pie that feels like a warm hug. For years, I swore off apple pie because it always seemed too bland and mushy—until now. This recipe changes everything: it’s the dream combo of a buttery, flaky double crust and a filling that nails that sweet-tart apple flavor, all thanks to a simple cooked-on-the-stove technique. If you’ve ever had trouble getting your pie just right, this one’s going to win you over with its perfect texture and deep apple aroma.
The beauty of this homemade apple pie lies in the layer of technique and care—the apples are cooked gently before baking, locking in rich caramel notes and just the right bite. Baking it feels like a cozy ritual: the scent in your kitchen is irresistible, and each slice is loaded with gooey-spiced apples surrounded by pastry that shatters at the fork. And let’s be real, when everyone comes running as soon as the oven timer dings, it’s pure kitchen happiness.
Why this Apple Pie Delivers on Flavor and Texture
A lot of apple pies lean too heavily on nostalgia and end up a little plain, but this one is a true flavor bomb. Cooking the apple filling before it meets the crust brings out a rich caramel goo, with the apples holding onto a tender bite instead of turning sludgy. That means when you tuck in, you get thoughtfully spiced apples layered inside a golden, crisp shell—never a soggy mess. The mix of Granny Smith, Gala, and Golden Delicious apples makes the filling complex, balancing tartness and sweetness, while the double crust adds that old-school comfort with some real textural fireworks.
What really sets this recipe apart is its fail-proof method: you control exactly how soft your apples get before baking, guaranteeing every slice comes out just right. It’s a great project for both pie pros and beginners, and once you taste that warm spice-and-vanilla scent wafting from the oven, you’ll know exactly why homemade apple pie beats anything from the shop.
Gather These Tools for Homemade Apple Pie Success
- A 12-inch high-sided skillet – For cooking the apples evenly and capturing all those caramelized juices.
- Potato peeler or apple peeler – To peel apples efficiently and avoid unnecessary kitchen drama.
- Sharp knife – Slicing apples into thin, even pieces is key to a textured filling.
- Half sheet pan or any pan with a lip – Cooling the filling quickly so it’s ready for the crust.
- Deep 23 cm (9 inch) pie dish – To hold all those luscious apples and double layers of crust.
- Rolling pin – For getting your pie dough to the perfect thickness.
- Rubber spatula – Helps you get every last bit of gooey filling into the shell.
- Baking sheet – Catches drips in the oven and helps the bottom crust cook evenly.
- Tin foil – A simple way to prevent the crust edges from burning.
- Pastry brush – For glossing up the crust with milk or egg for that just-baked sheen.
The Apples and More: Essential Ingredients
- pie crust – The backbone: golden, flaky, buttery, and holds all the goodness together.
- Lemon zest – Adds a fresh note to balance the sweet filling.
- Lemon juice – Prevents the apples from browning and boosts bright, tangy flavor.
- Apples – A mix of tart and sweet gives the pie the perfect bite.
- Brown sugar – Deepens the filling’s caramel flavor with toasty notes.
- Granulated sugar – Sweetens the apples and helps the filling set.
- All purpose flour – Thickens the juices so you get oozy, not soupy, slices.
- Kosher salt – Makes the other flavors pop and keeps the sweetness in check.
- Cinnamon – Spicy warmth that shouts “classic apple pie.”
- Nutmeg – Adds an earthy, slightly peppery undertone.
- Cardamom (optional) – A subtle touch of floral spice for sophistication.
- Vanilla – Rounds out the filling with soft, cozy depth.
- Milk (for brushing the pie) – Helps brown the crust in the oven.
- Beaten egg (optional, for brushing the pie) – Adds gloss and helps finish that bakery look.
- Raw sugar (for topping pie) – Provides a lovely crunch on top.
See the recipe card below for the full list of ingredients and measurements.
How to Make This Apple Pie Step by Step (with Love)
- Pick your apples. Choose a mix for depth—Granny Smith, Gala, and Golden Delicious work beautifully. You’ll want about 11 large apples.
- Grate in the lemon zest directly into your high-sided skillet, savoring that citrusy aroma.
- Squeeze in the lemon juice and swish it around the pan.
- Peel the apples with a potato peeler or apple peeler. Slice each one into thin (about 3 mm) pieces. As you go, toss the slices into the pan with the lemon juice, stirring so none of the slices brown.
- Once all apples are peeled and sliced, set the skillet over medium heat.
- Add the brown sugar, granulated sugar, flour, salt, cinnamon, nutmeg, and cardamom (if using). Gently stir so every apple slice is coated and keep the slices intact.
- Once everything is mixed and you no longer see pockets of flour or spices, cover with a lid and cook for 20 minutes, stirring every 3 minutes. The apples should become fork tender but still retain their shape. If the apples start to stick to the pan, add a splash of water sparingly.
- When the apples reach your preferred level of tenderness, take the pan off the heat. Stir in the vanilla and feel that comforting wave of aroma.
- Pour the hot filling (don’t miss the thick caramelized juices) onto a half sheet pan, spreading it evenly. Cool the filling completely in the fridge or freezer—about 30 minutes. This keeps the crust from getting soggy.
- Roll out your pie dough and place one piece in your deep pie dish, letting the extra pastry hang over the edges.
- Scrape every last gooey apple slice and syrup into the pie crust using a rubber spatula—it’s worth the effort for flavor alone.
- Lay your second piece of dough on top. Try a lattice design if you’re feeling artistic, or just cover the whole pie for rustic charm. If you skip the lattice, poke a few vents with a knife.
- Fold the crust edges inwards and crimp them however you like. For extra flakiness, chill the whole pie in the fridge or freezer for 20–30 minutes.
- Slide a baking sheet into your oven’s middle rack and preheat to 220°C. Let the oven get fully hot while the pie chills.
- Before baking, brush the crust with milk, egg, or both. Milk adds matte browning, egg brings a glossy shine—choose your look. Sprinkle raw sugar over for sparkle and crunch.
- Set the chilled pie onto the hot baking sheet. Bake for 15 minutes; you’ll see the crust edges turning a gentle golden.
- While the pie starts baking, make a quick foil shield: fold a square of tin foil, cut a circle in the center, and unfold it. This protects the crust edges from overbrowning.
- After the first 15 minutes, reduce oven to 175°C. Cover the pie edge with your foil shield and return the pie to the oven.
- Bake for another 40–45 minutes, until the center is light golden brown and the juices bubble happily through the vents or lattice.
- Cool the pie on a rack for at least 4 hours, even if you feel impatient! This helps the filling set and makes each slice neat and luscious.
- Slice, serve, and enjoy—especially with vanilla ice cream or, for the decadent crowd, a drizzle of caramel sauce.
- Store leftover pie covered at room temperature for up to 2 days, or transfer to the fridge after that.
Tips, Troubleshooting, and Common Mistakes for the Best Pie
- Avoid mushy apples by cooking to just-fork-tender before baking. Keep a close eye during the stovetop stage—you want the slices to keep their shape.
- Don’t skip cooling the filling before assembling the pie. Hot filling will melt the dough and ruin your flaky crust.
- Too-sweet filling? Try reducing either sugar (brown or white) by a small amount, depending on how tart your apples are.
- Crust not browning or getting soggy? Preheating the baking sheet gives the bottom crust a jump start and keeps it crisp.
- Edges burning? Always use that tin foil shield as soon as the crust edges start to color up, so everything finishes evenly.
- Still juicy after slicing? Letting the pie cool fully is non-negotiable; otherwise, the juices won’t set and your slice will get messy.
Pairing Ideas and Easy Variations for Apple Pie
Nothing says comfort like a warm wedge of apple pie next to a scoop of vanilla ice cream—the classic pairing for good reason. You might also love pouring over a little caramel sauce for something extra special. If you’re serving guests, freshly whipped cream or even a sharp cheddar cheese wedge (a Midwest favorite!) can round things out.
As for variations, swap cardamom for clove if you’re in the mood for bolder spice, or leave it out for classic flavor. You can use all granny smith apples for a tangier pie, or go all sweet with just Galas. Trying to make it a bit lighter? Use a little less sugar or serve smaller slices with plenty of fruit. For a festive touch, stir some minced dried cranberries into the filling or crush a few gingerbread cookies and sprinkle over the top before baking.
FAQs about Apple Pie
Can I make Apple Pie ahead of time?
Absolutely! You can prepare the filling and pie dough up to two days in advance. Assemble and bake the pie a day before you need it. Let it cool fully, then cover with plastic wrap and store at room temperature. Warm gently in the oven before serving if you like.
What’s the best way to store leftover Apple Pie?
Keep the pie covered on the counter for up to 2 days. After that, move it to the fridge. The crust stays flakiest at room temp, but refrigeration will keep it fresh a little longer—just allow it to come back to room temperature or reheat gently before enjoying.
Can I freeze Apple Pie?
You can! For best results, freeze the fully baked and cooled pie (well wrapped) or freeze the unbaked, fully assembled pie and bake from frozen—just add extra bake time and protect the edges with foil. The texture of the filling might change slightly, but the flavor will hold up beautifully.
The Final Slice: Why This Apple Pie Belongs on Your Table
There’s nothing quite like that first cut into a golden, bubbling apple pie—the gentle tug as the pastry flakes give way, and the sweet, spiced aroma that fills the air. Every bite is a reminder that homemade pies are worth every minute of anticipation. Whether you’re making this apple pie for a celebration or just a chilly weekend, you’ll find it’s pure comfort in a slice, and there’s always someone asking for seconds!
More Delicious Recipes
- St. Patrick’s Day Chocolate Guinness Bundt Cake with Stout Glaze: This cake offers a deep, rich flavor that beautifully complements the warm spices of apple pie.
- Vanilla Bean St. Patrick’s Day Cookies: These cookies add a delightful sweetness and can be enjoyed alongside a slice of apple pie for an extra treat.
- Crispy Irish Bacon Potato Skillet: A savory dish that creates a comforting meal vibe, perfect for serving before indulging in dessert like your homemade pie.
Best Recipe for Apple Pie
Ingredients
Equipment
Method
- Choose your apples. You need 5 pounds of apples for this recipe, which is about 11 large apples. I like to use a mix of apples for the best flavor. For this pie I used Granny Smith, Gala, and Golden Delicious.
- Make the filling: Use a microplane grater to zest 1/4 teaspoon lemon peel into a 12 inch high sided skillet.
- Add the juice from half the lemon to the skillet, about 2 tablespoons.
- Use a potato peeler or this handy apple peeler to peel the apples. Slice the apples into 1/8 inch pieces. Check out the photos above to see my method for slicing apples. I like to peel and slice one apple at a time so that they don't get brown; I peel one apple, then stop and slice it, add it to the lemon juice, and then move on to peeling the next apple. Stir the apples in the pan occasionally to coat everything with lemon juice.
- Once you have all the apples peeled and sliced in the pan, set it over medium heat on the stove.
- Add 3/4 cup packed brown sugar, 3/4 cup granulated sugar, 5 tablespoons flour, 1/4 teaspoon salt, 1 and 1/2 teaspoons cinnamon, 3/4 teaspoon nutmeg, and 1/2 teaspoon cardamom. Stir it together gently so you don't break all the apples.
- Once the mixture is all moistened and you don't see patches of flour or cinnamon, set a timer for 20 minutes. Cover the mixture with a lid but don't walk away. Stick around and stir the mixture every 3 minutes or so, Replacing the lid each time. Cook for 20 minutes, until the apples are fork tender but still hold their shape. The apples will not soften more while baking in the oven. So have a taste and see if you want to cook a longer or shorter time. Only you can know your apple al dente perfection level. If your apples start to stick to the pan, add 1 tablespoon water as needed; use sparingly.
- Remove the pan from heat and stir in 1 teaspoon vanilla.*
- Transfer the apple pie filling (including the brown caramel gooeyness) to a half sheet pan, or any pan with a lip. Spread the apples all the way to the edges. Cool the apple pie filling completely by placing it in the fridge or the freezer, it only takes 30 minutes or so. (If you have plenty of time, you can just leave the apples in the pan to cool down; it will take a couple hours.)
- Roll out your pie dough and place in a deep 9 inch pie dish, with the excess hanging over the edges. See my pie crust post for lots of photos and details.
- Use a rubber spatula to scrape all the chilled apple pie filling into the pie dish. Don't forget to scrape in every last bit of the gooey filling.
- Top your pie with the other pie crust. Follow this recipe for How to Make a Lattice Pie Crust, if you like. It's so pretty and not as hard as you think. You can also just toss the crust on whole. It's going to taste delicious either way! See my pie crust recipe for details on topping with a whole crust.
- Fold the edges in and crimp however you like. If you didn't do a lattice, make sure to vent your pie by poking the top a few times with a sharp knife.
- Place the whole pie in the fridge or freezer for about 20-30 minutes, for a really flaky crust.
- Place a baking sheet in the center rack of your oven and preheat to 425 degrees F. Let it heat up for at least 20-25 minutes to make sure it's really hot.
- Right before putting it in the oven, brush the crust of your pie all over with milk or egg, or both. I like to use 1 tablespoon milk beat together with 1 tablespoon beaten egg that I have leftover from making my homemade pie crust. You can just use milk if you don't have beaten egg lying around. Milk will help your pie crust brown but will stay matte; egg will add gloss and shine to your pie crust.
- Sprinkle the whole pie with raw sugar, or regular sugar is fine too.
- Place the chilled pie onto the baking sheet in the oven and let bake for 15 minutes. The crust on the edge should be turning light brown.
- Meanwhile, get a square of tin foil that is the same size as your pie. Fold it in half, then in half again. Cut out the center. Open it up again. You should have a square of foil with a circle cut out of the center. See pie crust post for photos.
- Reduce the heat to 350 degrees F. Remove the pie from the oven and place the foil on top. Loosely crimp it around the crust on the edge. This will protect it from burning.
- Don't forget to lower the oven temperature to 350. Place the pie back on the baking sheet in the oven and bake at 350 for 40-45 more minutes.
- You will know the pie is done when the edges are brown and the center is light golden brown. If you did a lattice crust, you should see the filling bubbling away nicely.
- Let the pie cool on a wire rack for about 4 hours. I know, this is killer. But if you cut into it now, the juices will be lava hot and way too liquid-y. You have to wait for it to cool to room temperature to get the right texture for the filling. Pie! A lesson in patience indeed.
- Once the pie is completely cool, slice and serve! My husband Eric considers it a crime to serve this without vanilla ice cream, and I tend to agree. Treat yoself right. Add in some caramel sauce for a really decadent treat!
- Store the pie on the counter for up to 2 days, covered with plastic wrap. After that transfer it to the fridge.