If you’ve been on the hunt for a treat that’s both wildly fun and guaranteed to make you feel like a kitchen magician, DIY rock candy is calling your name. There’s this moment—right after you peek into the jar and catch glimmers of growing sugar crystals—when you realize you’re not just making candy, you’re growing it right on your countertop. It’s science, nostalgia, and dessert all rolled into one.
Growing up, I only ever saw rock candy at fairs or tucked away in jars at old-school candy shops, brightly colored and sparkling like edible jewels. The first time I made DIY rock candy at home, I was completely hooked by the transformation: a simple sugar solution morphing into crunchy, vibrant candy. Not only is it delicious to eat, it’s the kind of recipe that turns any week into a tiny celebration—especially if you’ve got bored kids or a streak of curiosity yourself.
Why DIY Rock Candy Is the Ultimate Homemade Treat
DIY rock candy is a crowd-pleaser on so many levels. It’s an edible science project that brings out the inner kid in everyone—whether you’re hosting a rainy-day activity or just looking for something sweet to nibble after dinner. You don’t need fancy tools or candy thermometers, just a little patience and basic kitchen staples.
What really makes homemade rock candy a standout is its mix of hands-on creativity and pure, simple flavors. You get to watch those dramatic, shimmery crystals form day by day, then break off crunchy, jewel-toned sticks to enjoy or give away. If you’re after an easy kitchen adventure that doubles as a learning experience, this old-school treat delivers every time.
The Sweet Breakdown: DIY Rock Candy Ingredients Explained
The beauty of making rock candy yourself is just how simple the ingredient list is—no hidden extras or preservatives, just the building blocks of pure, crunchy candy. Here’s what gives each batch its classic structure, flavor, and color:
- Wooden skewers: provide the anchor for sugar crystals to grow—think of these as your crystal-growing “garden stakes.”
- Mason jars: hold the sugar solution and keep your candy projects contained and upright.
- Clothespins or chip clips: balance the skewers over the jars, making sure everything stays in place while your rock candy forms.
- Water: acts as the solvent, dissolving the sugar and creating a saturated solution.
- Granulated sugar: supplies all the sweetness and forms those iconic crunchy crystals. You’ll use a little extra for prepping the skewers.
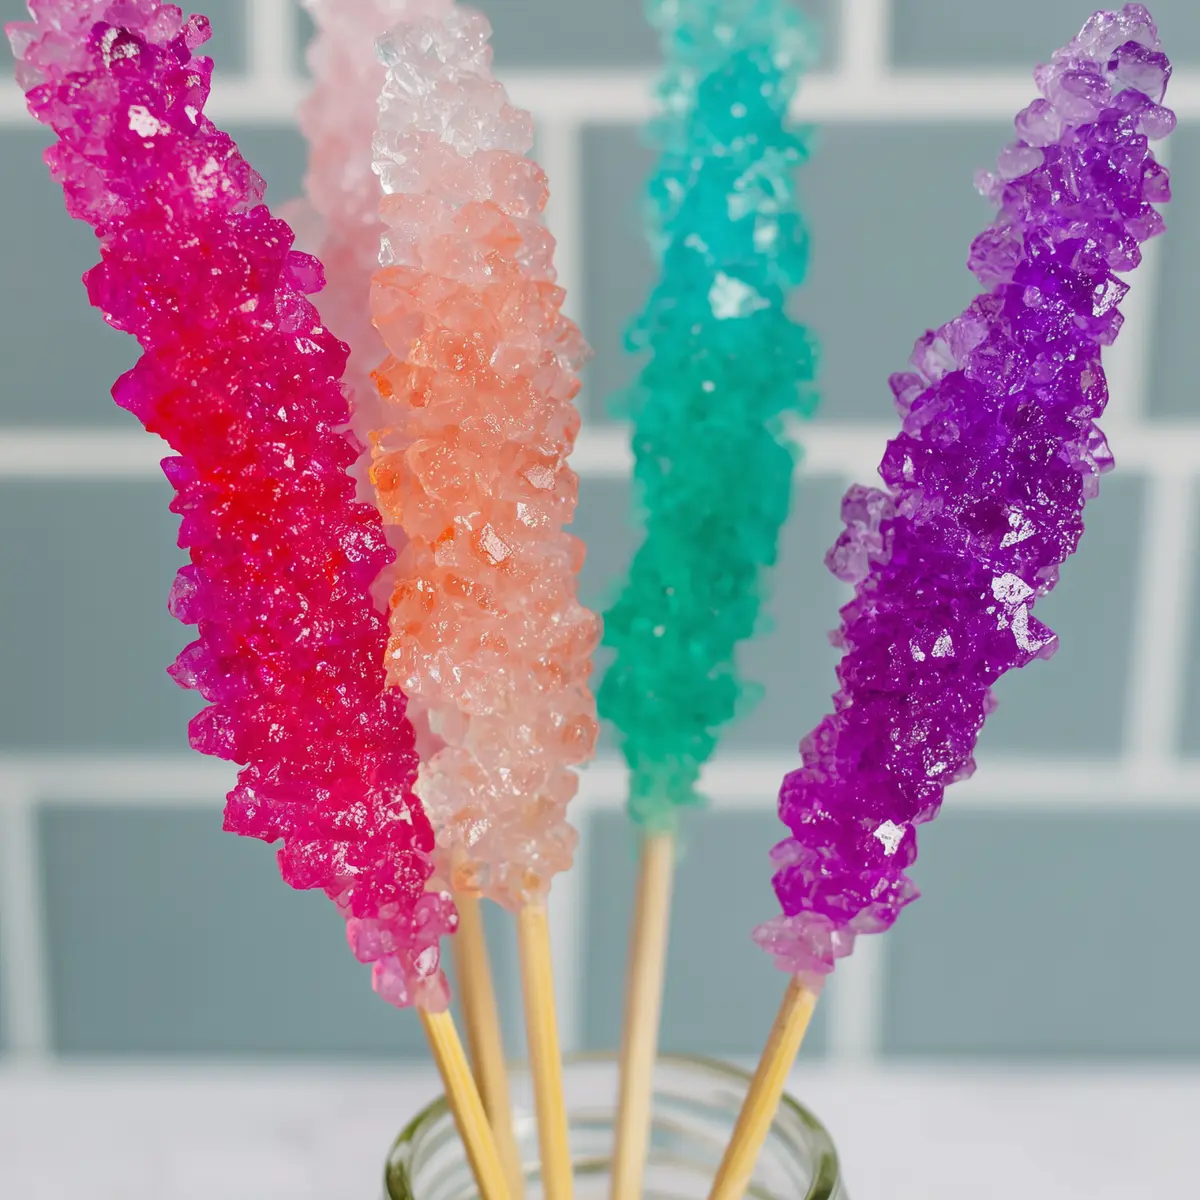
- Food coloring: adds vibrant hues to your rock candy—go bold, pastel, or mix colors for a custom look.
See the recipe card below for the full list of ingredients and measurements.
Swap This for That: Customizing Your Rock Candy
If you want to shake things up or don’t have every ingredient handy, DIY rock candy is easy to adapt. No wooden skewers lying around? Try using clean chopsticks, lollipop sticks, or even kitchen-safe twigs. Tall drinking glasses or recycled jam jars can stand in for mason jars—just be sure they’re cleaned well and sturdy enough for hot liquids.
For food coloring, natural juices (like beet, blueberry, or turmeric tea) bring soft, earthy colors if you’re steering clear of artificial dyes. And if you only have superfine sugar instead of regular granulated, it’ll dissolve a bit quicker (just note the crystal size might vary). The real key is having the most saturated sugar solution possible—get creative within that structure, and you’re golden.
From Solution to Sparkle: DIY Rock Candy Made Simple
Here’s how you’ll turn an ordinary kitchen into a candy workshop with some patience and a bit of sticky fun. The process is surprisingly soothing—lots of stirring, a little waiting, and then pure magic as your sugar crystals grow.
- Start by soaking your skewers in water, then rolling them in sugar so they form a gritty surface. Letting them dry fully is key—this encourages the first crystals to latch on and gives you chunkier, more impressive candy at the end.
- Prep your jars so they’re clean, warm, and ready to hold hot syrup. Secure a clothespin or chip clip to each skewer, then balance them across the jars. The trick is keeping each stick from touching the jar’s sides or bottom so your crystals grow all around the skewer instead of clumping at the bottom.
- In a big saucepan, bring your water to a gentle boil. Gradually stir in the sugar, one scoop at a time, letting it fully dissolve before adding more. As you go, the syrup thickens—pause and admire the glossy shine forming as it saturates.
- Once you’ve added the last of the sugar and the solution is glistening and almost glassy, let it simmer briefly. Remove from the heat, and allow it to cool a bit—you don’t want to pour scalding liquid into glass jars!
- Pour the warm syrup into your prepared jars. Add drops of food coloring to each (or swirl two colors for a marbled effect). Set the jars in a spot where they can rest undisturbed—on a shelf, counter, or even inside a cold oven if you’re short on space.
- Gently lower your sugar-coated skewers into the jars, making sure they’re hanging freely. This is the hardest part: let them sit and resist the urge to fiddle! Over the next few days, watch as sugar crystals creep up and cluster, eventually forming a thick, crunchy coating.
- Once your rock candy looks bold and chunky, break through any crust that forms at the surface and gently loosen the skewers. Let the syrup drip off for a few minutes before you dig in. Snap a piece off, share a stick, or save some for a rainy day craving.
Sweet Success: Tips for Perfect Rock Candy Every Time
A handful of little details can make the rock candy process smooth and nearly foolproof. Let your skewers dry thoroughly after sugaring—this jumpstarts crystal growth and means less waiting. When balancing your skewers over jars, double-check that each one stays suspended and doesn’t touch the base or walls—the crystals need open space to really form.
Keep the jars in a draft-free, quiet area; even small shakes can mess with the delicate sugar structures. If you notice tiny crystals on the bottom, don’t panic—that just means you’ve got a well-saturated solution. Patience is your best friend here; letting everything sit for several days means bigger, crunchier candies at the end.
For storage, let your finished rock candy air dry for a little while. Store in a dry, airtight container on the counter. These homemade sticks can last surprisingly long (if you manage not to eat them all right away).
Colorful Ideas and Tasty Variations
DIY rock candy is essentially a blank slate for all kinds of wild, festive variations. For flavor, you can add a drop of mint, lemon, orange, or vanilla extract to each jar just after coloring—it infuses the crystals with a delicate essence that plays perfectly with the sweetness. Go bold with deep jewel tones, or skip food coloring for a classic clear candy look.
Hosting a birthday party? Match candy colors to your theme. For gift giving, wrap sticks in cellophane and tie with string or ribbon. Around holidays, red and green for winter celebrations or pastels for spring make the candy extra special. For the ultimate edible science experiment, try combining two drops of different dye in one jar for a mesmerizing two-tone effect.
Rock candy also shines as a party favor, edible drink stirrer, or a showstopping topping for cupcakes and cakes. Honestly, the only limit is how many jars you have room for on your counter.
FAQs about DIY Rock Candy
How do you make DIY rock candy without a skewer?
You can use clean chopsticks, string, or lollipop sticks in place of skewers. The key is choosing something food-safe and long enough to suspend in your jar without touching the sides or bottom.
Why isn’t my rock candy forming crystals?
If no crystals are growing, your solution might not be saturated enough. Stir in more sugar until it refuses to dissolve, and make sure your coated stick is completely dry before submerging.
Can you make rock candy with natural food coloring?
Yes, natural dyes like beet juice, spinach water, or blueberry juice give soft, unique colors. Just be aware that they may result in subtler shades compared to artificial colorings.
Is it possible to make rock candy with less sugar?
Rock candy depends on a highly saturated sugar solution. While you can use smaller batches, cutting the sugar too much will keep crystals from forming properly.
Final Thoughts on DIY Rock Candy
Bringing a batch of DIY rock candy to life is more satisfying than you might expect. Watching those crystals grow day by day, then cracking off a jewel-hued stick—it’s the kind of kitchen project that entertains, educates, and sweetens your week all at once.
Once you try this process, you’ll find yourself dreaming up new colors and flavor ideas before the jars even hit the sink. Whether you’re making memories with kids or just want to revisit a classic treat, homemade rock candy is a sweet little tradition worth repeating.
More Delicious Recipes
- St Patrick’s Day Snack Board: This colorful snack board is perfect for celebrations and can inspire fun, creative snack presentations similar to DIY rock candy.
- St Patrick’s Day Brownie Trifle: A visually stunning dessert that channels the festive spirit, much like the vibrant colors of rock candy.
- St Patrick’s Day Chocolate Guinness Bundt Cake with Stout Glaze: This rich cake offers indulgent flavors and is great for pairing with sweet treats, including rock candy for a delightful dessert spread.
DIY Rock Candy
Ingredients
Equipment
Method
- Submerge skewers in water, coat them in sugar, and then set out to dry. I like to do this a day ahead of time, but as long as you let them dry for an hour, they should be fine.
- Make sure your jars are clean and not cold (run hot water through them if necessary). Attach a clothespin or chip clip to the top of each skewer and then balance over the top of jars. Be sure your skewer is hanging about an inch from the bottom of the jar as the rock candy crystals will stick to the bottom of the jar and will make it tough to remove skewers.
- In a large saucepan, bring water to a boil. Add sugar in one cup at a time, stirring with a wooden spoon and letting each cup fully dissolve before adding the next. You'll notice it becomes harder and harder for the sugar to dissolve as you add more in.
- Once your final cup of sugar has been dissolved, let mixture simmer for about 5 minutes before removing from heat. Let mixture rest off the heat for about 15 minutes.
- Divide sugar solution amongst the 5 prepared jars. Stir in food coloring at this time. I recommend bringing your jars to where they'll be resting for the next 6-7 days at this time. Be sure to use caution as the jars will be very hot. Once they're in their resting spots, place prepared skewers into solution. You'll want to try your best not to move jars around much once skewers are in place.
- You'll likely see little crystals forming within hours, but you'll want to let the jars rest for 6-7 days to let sugar crystals fully form.
- When ready to remove rock candy sticks from jars, use your finger or a fork to gently crack the hardened sugar on top of the jar and gently wiggle the stick to release. Let solution drizzle from stick (I recommend setting the candy over an empty jar or bowl to let it drip) before enjoying the candy.