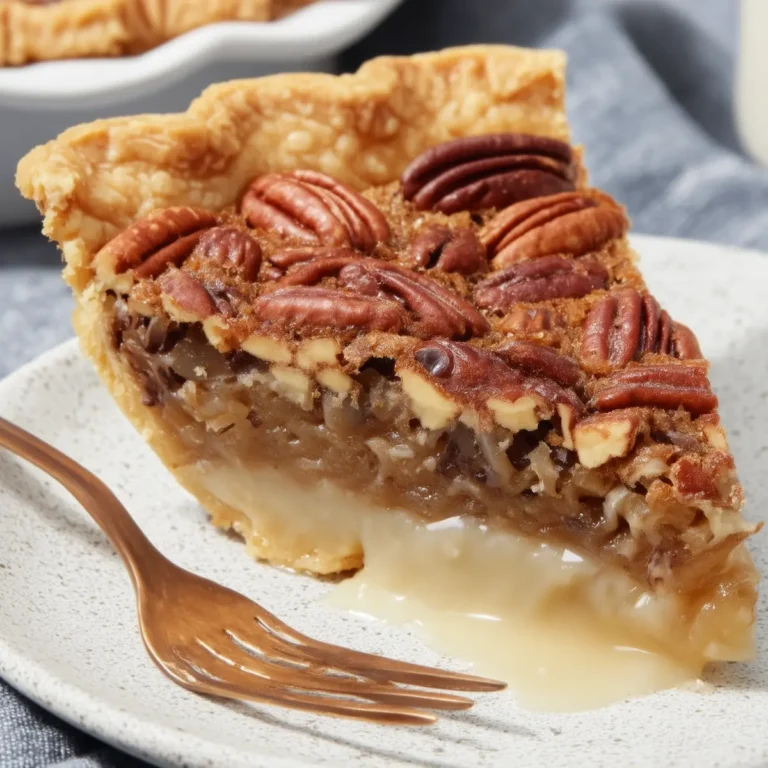
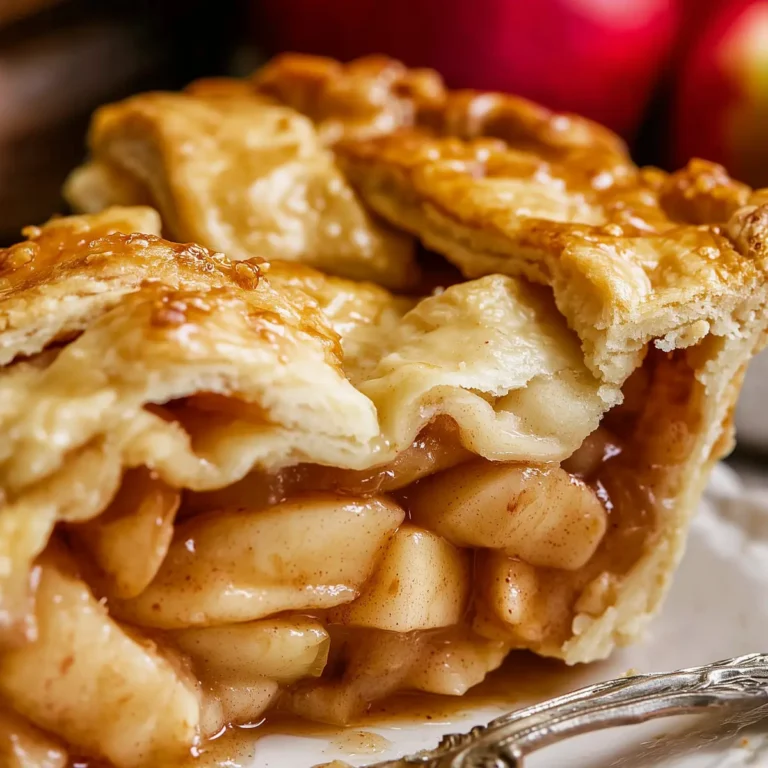
The first thing that hits you as this Dutch Apple Crumble Pie cools on the kitchen counter is the deep, sweetly spiced aroma—the apples mingling with cinnamon, nutmeg, and that buttery golden crumb on top. Every time I make this pie, it takes me right back to chilly autumn mornings when the only thing warming the house was something baking in the oven. This isn’t just your typical apple pie. The magic lies where a flaky crust meets tender, intensely flavored apples and the most addictive crumb topping you’ll ever taste. When you cut in, the filling holds together perfectly—never runny—while each bite balances sweet, tart, and spice in just the right way.
What Makes This Dutch Apple Crumble Pie So Irresistible
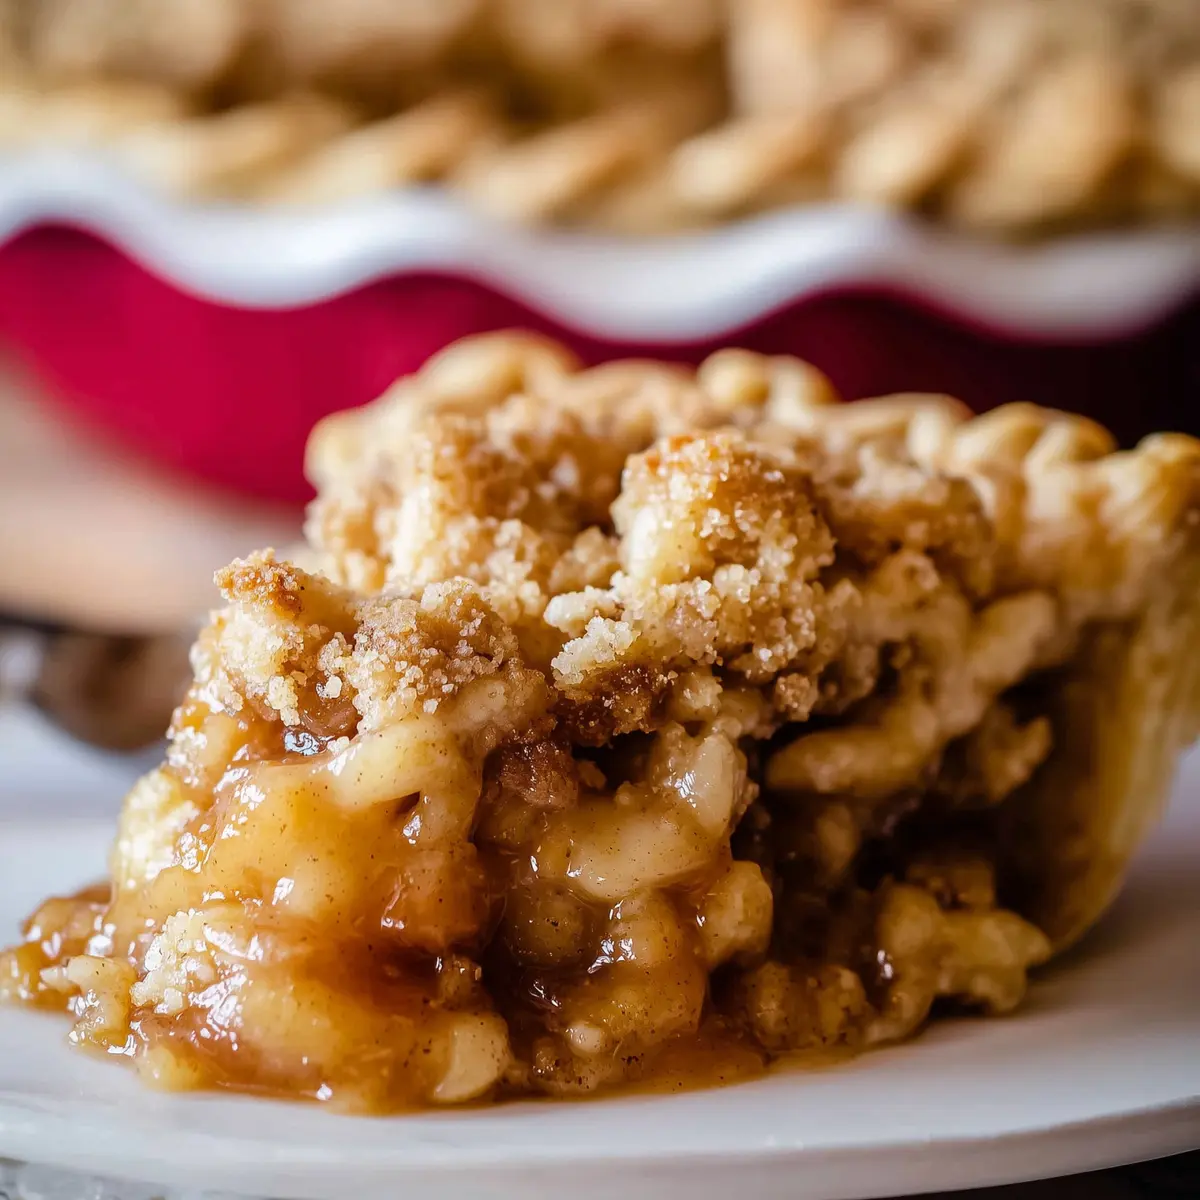
There’s classic apple pie, and then there’s Dutch Apple Crumble Pie—the kind of dessert that starts conversations and becomes “the pie” friends and family ask for again and again. The trick is in the layers: you get a buttery, tender base (no sogginess here), a cooked apple filling that’s richly spiced and just tart enough, then a crumb topping that bakes up like the best part of a streusel coffee cake. Every bite is textural heaven—crisp, buttery top, soft apples, sturdy crust. It bridges the gap between a homey apple pie and a decadent bakery dessert. This is the pie you bake for big holidays, Sunday dinners, or just to use up those apples lingering in your fridge.
The Ingredients That Make This Pie Shine
It’s worth taking the time to use fresh, good-quality ingredients—each one does heavy lifting to give you that trademark Dutch Apple Crumble Pie vibe.
- Pie crust – A single, homemade sheet of pie dough is truly unbeatable for flakiness and flavor, but store-bought will work in a pinch.
- Lemon zest – Just a bit of zest lifts the flavor of the apples and gives a subtle brightness that keeps things from getting too sweet.
- lemon juice – A splash wakes up the apples and helps prevent browning. Freshly squeezed is best for pure, tart flavor.
- Apples – The heart of this pie! Use a mix of varieties—think Granny Smith for tartness, Honeycrisp for sweetness, and Golden Delicious for a silky texture.
- Brown sugar – Adds moistness and a warm caramel note to both the filling and the crumble topping.
- Granulated sugar – Gives the filling that clean, straightforward sweetness and helps the crumb topping brown nicely.
- All-purpose flour – Keeps the filling together and forms a tender base for the crumb topping.
- Kosher salt – Just enough to sharpen and balance out all the sweet flavors.
- Cinnamon – The backbone of any proper apple pie, bringing warmth and that nostalgic aroma.
- Nutmeg – A little grated in for depth and complexity.
- Cardamom (optional) – If you love a floral, almost citrusy twist, add a touch for something special.
- Vanilla – A splash at the end rounds out everything and brings the filling together.
- Butter – Melted for the crumble, it ensures the top bakes up crisp and golden, never dry.
See the recipe card below for the full list of ingredients and measurements.
Bringing This Dutch Apple Crumble Pie Together Step by Step
Making Dutch Apple Crumble Pie isn’t as tricky as it looks—the prep just needs a little love and a bit of patience, especially for that gorgeous filling.
- Start with the apples. Peel and core them one at a time, slicing each into thin pieces so they cook evenly. Toss each sliced apple straight into a pan where you’ve already zested and squeezed in a bit of lemon—this keeps them lively and prevents browning as you go.
- Once all your apples are ready, gently cook them in the pan with brown sugar, granulated sugar, flour, a pinch of salt, cinnamon, nutmeg, and cardamom if you’re feeling adventurous. Stir carefully so you don’t break up the apples; you want them to stay in juicy, intact slices. Cover and cook until the apples are tender but not mushy—think perfectly “al dente” fruit that holds its shape.
- Off the heat, stir in a splash of vanilla. Spread the filling on a rimmed baking tray and chill completely in the fridge or freezer. This stops the filling from making the crust soggy later on.
- While the filling cools, roll out your pie crust, fit it into a pie dish, and put it in the fridge or freezer. Cold dough is the key to a flaky base!
- For the crumb topping, combine flour with white and brown sugars, a pinch of salt, and melted butter. Stir until you have chunky soft crumbs (try not to eat them all at this point—resist!). Chill this mixture so the topping holds its shape when baked.
- When everything is cold, heap the chilled apple filling into the pie shell. Top evenly with half of the crumb mixture—enough to cover the apples but not overloaded. Return the rest of the crumbs to the fridge for later.
- Bake the pie on a hot baking sheet to help the bottom set beautifully and avoid a soggy crust. After 15 minutes at high heat, lower the oven and let the pie bake a bit more. Remove it briefly, top with the rest of the chilled crumb topping, then tent the edges with foil to prevent over-browning.
- Finish baking until the top is golden all over and you see gentle bubbling. If you want deeper color, bake uncovered for a few extra minutes right at the end.
- This is the hard part—let the pie cool for several hours so the juices set. Cutting too soon will lead to a soupy mess. Patience makes for those neat, picture-perfect slices.
Getting That Perfect Balance of Texture and Flavor
A Dutch Apple Crumble Pie should have contrast in every bite. Aim for apples that are tender but hold their shape—not mushy, not crunchy. Cooking the filling on the stovetop lets you fine-tune that just-right texture; taste as you go and pull them from the heat at your personal sweet spot. The crumble topping pulls double duty: it starts off as a modest layer that almost melts into the apples, then you pile more on halfway through baking for maximum crunch on top. Make sure your butter is melted and chilled before topping the pie, so the crumble bakes up golden with distinct, crisp peaks. That’s how you get a pie that slices beautifully and delivers perfect forkfuls—flaky base, soft filling, crisp sweet topping—every single time.
Tips, Serving Ideas, and Ways to Make This Pie Your Own
If you want to put your own spin on this classic, it’s easy to mix things up. Use whatever apple varieties you love or have on hand—a blend of tart and sweet brings the best flavor dimension. Prefer your filling a little less sweet? Dial back the sugar just a bit, and toss in more lemon zest for brightness. If cardamom isn’t your thing, skip it—or swap in a bit of ground ginger or even allspice. For the crumb topping, browning the butter before mixing it in gives a deep, nutty note that really shines.
To keep your bottom crust crisp, always bake the pie on a preheated sheet pan or pizza stone. Letting the filling and the assembled pie chill thoroughly before baking helps prevent sogginess as well. Once baked and cooled, this pie keeps fresh for a couple of days at room temperature, covered loosely; after that, tuck it into the fridge. Want to freeze leftovers? Wrap slices well and freeze individually—they thaw beautifully for a quick dessert. And don’t skip the vanilla ice cream on the side; the contrast of cold cream with warm spices is what dreams are made of. For a truly decadent finish, a drizzle of salted caramel sauce makes it nearly impossible to stop at one slice.
FAQs about Dutch Apple Crumble Pie
Can I use store-bought pie crust for Dutch Apple Crumble Pie?
Absolutely. While homemade pie crust gives the richest flavor and flakiest texture, a store-bought crust can save time and still bakes up nicely under all that apple and crumb goodness.
What’s the best apple variety to use in Dutch Apple Crumble Pie?
A mix of apples is ideal for both taste and texture. Try combining Granny Smith (for tartness), Honeycrisp (for sweetness and snap), and Golden Delicious (for softness). Adjust based on what’s available or what you love most.
Can I make Dutch Apple Crumble Pie ahead of time?
Yes, this pie is a great make-ahead dessert. You can fully bake it a day in advance—just let it cool, cover, and leave it at room temperature or refrigerate. For maximum crunch, add the final layer of crumb topping during the second half of baking.
How do I store and reheat leftover pie?
Keep leftover pie covered at room temperature for up to two days, then move to the fridge. To reheat, warm slices in a low oven until just heated through; the topping will crisp up nicely again.
Does this pie freeze well for later?
Dutch Apple Crumble Pie freezes beautifully. Once baked and cooled, wrap slices tightly and freeze. To enjoy, thaw at room temperature, then rewarm briefly in the oven to restore that crisp topping and soft filling.
After hours of anticipation—and maybe an envious glance or two in the kitchen—cutting into a cooled Dutch Apple Crumble Pie is the reward. Each slice bursts with apple flavor and that sweet, buttery crumb that practically shatters with your fork. Whether you eat it standing at the kitchen counter or serve it at a festive table with scoops of ice cream, it’s comfort and nostalgia in every bite. Save a piece for breakfast if you can; this is a pie that never lasts long.
More Delicious Recipes
- St Patrick’s Day Chocolate Guinness Bundt Cake with Stout Glaze: This rich and flavorful cake pairs beautifully with the spices in apple pie, making it a delightful dessert option.
- St Patrick’s Day Brownie Trifle: The layers of brownie and cream in this trifle provide a contrasting texture that complements any pie experience.
- Vanilla Bean St Patrick’s Day Cookies: These sweet cookies make for a great companion to the warm flavors of Dutch Apple Crumble Pie.
Dutch Apple Crumble Pie Recipe
Ingredients
Method
- Choose your apples. You need 5 pounds of apples for this recipe, which is about 11 large apples. I like to use a mix of apples for the best flavor. For this pie I used Granny Smith, Honeycrisp, and Golden Delicious.
- Make the filling: Use a microplane grater to zest 1/4 teaspoon lemon peel into a 12-inch high sided skillet. The heat should be off.
- Add the juice from half the lemon to the skillet, about 2 tablespoons. Don't use much more than this, you're not making a lemon apple pie. We just want to wake up the apples a bit and keep them from browning.
- Use a potato peeler or this handy apple peeler to peel the apples. Slice the apples into 1/8 inch pieces. Check out the photos above to see my method for slicing apples. I like to peel and slice one apple at a time so that they don't get brown: I peel one apple, then stop and slice it, add it to the pan with the lemon juice, and then move on to peeling the next apple. Stir the apples in the pan occasionally to coat everything with lemon juice.
- Once you have all the apples peeled and sliced in the pan, set it over medium heat on the stove.
- Add 1/2 cup packed brown sugar, 1/2 cup granulated sugar, 1/3 cup flour, 1/2 teaspoon kosher salt, 1 and 1/2 teaspoons cinnamon, 3/4 teaspoon nutmeg, and 1/2 teaspoon cardamom (optional). Stir it together gently so you don't break all the apples.
- Once the mixture is all moistened and you don't see patches of flour or cinnamon, set a timer for 20 minutes. Cover the mixture completely with a lid, but don't walk away. Stick around and stir the mixture every 3 minutes or so, replacing the lid each time. Cook for 20 minutes, until the apples are fork tender but still hold their shape. The apples will not soften more while baking in the oven. So have a taste and see if you want to cook a longer or shorter time. Only you can know your apple al dente perfection level. If your apples start to stick to the pan, add 1 tablespoon water (plus more as needed); use sparingly.
- Remove the pan from heat and stir in 1 teaspoon vanilla.*
- Transfer the apple pie filling (including all the the brown caramel gooeyness) to a half sheet pan, or any pan with a lip. Spread the apples all the way to the edges. Cool the apple pie filling completely by placing it in the fridge or the freezer. If you put it in the freezer, it only takes 30 minutes or so. (If you have plenty of time, you can just leave the apples in the pan to cool down; it will take a couple hours.)
- Roll out your pie dough and place in a 9-inch pie dish. Fold the edges underneath and crimp them with your fingers and thumbs. See my pie crust recipe for lots of photos and details.
- Place the pie crust in the fridge or freezer for about 30 minutes, for a really flaky crust.
- While the crust and filling are chilling, place a baking sheet or pizza stone in the center rack of your oven and preheat to 425 degrees F. Let it heat up for at least 20-30 minutes to make sure it's really hot.
- Make the sugar crumble: In a medium bowl, add the dry ingredients for the crumble: 1 and 1/2 cups flour, 1/3 cup white sugar, 3/4 cup packed brown sugar, and 1/2 teaspoon kosher salt (use less for table salt). Whisk together.
- In a small bowl, melt 3/4 cup butter (1 and 1/2 sticks). Pour the butter over the dry ingredients and stir together gently. You should end up with a pretty wet sandy mixture with some large clumps. See photos. Let it chill in the fridge until you are ready to assemble. Try not to eat it all.
- When the apple pie filling in the freezer is completely cooled, and the pie shell is mostly frozen, take them out of the freezer. Use a rubber spatula to scrape all the chilled apple pie filling into the pie shell. Don't forget to scrape in every last bit of the gooey filling.
- Use your hands or a fork to break the crumble into smaller bite size pieces. Top the pie with about a cup or two of the sugar crumble, not all of it! You only want to add enough to cover all the apples, we are not piling it on. (That's for later.) Place the remaining crumble back in the fridge to chill.
- Bake the pie: Place the chilled pie onto the baking sheet in the oven and let bake for 15 minutes at 425 F. The crust on the edge should be turning light brown.
- Meanwhile, get a square of tin foil that is the same size as your pie. Fold it in half, then in half again. Cut out the center. Open it up again. You should have a square of foil with a circle cut out of the center (or use a pie shield). See pie crust post for more details.
- After baking at 425 for 15 minutes, reduce the heat to 350 degrees F. Don't take the pie out of the oven. Just change the temperature. Bake at 350 for an additional 10 minutes.
- At this point, remove the pie from the oven and quickly shut the oven door. Sprinkle the remaining chilled crumble all over the top of the pie. Break up large pieces with your fingers. Place the foil on top of the pie crust (the center of the pie should be exposed). Loosely crimp it around the crust on the edge. This will protect the edges from burning.
- Don't forget that your oven temperature should be at 350. Place the pie back on the hot baking sheet in the oven and bake at 350 for about 25-35 more minutes. (the pie should be in the oven for a total of about 55-65 minutes)
- You will know the pie is done when the edges of the crust are brown and the crumble is turning a light golden brown in the center. If you want your crust and crumble to brown a little more, remove the foil shield and bake another 5-10 minutes.
- Let the pie cool on a wire rack for about 4 hours. I know, this is killer. But if you cut into it now, the juices will be lava hot and way too liquid-y. Your crumble will get wet and soggy sad. You have to wait for it to cool to room temperature to get the right texture for the filling AND to not ruin the crumble. Pie! A lesson in patience indeed.
- Once the pie is completely cool, slice and serve! My husband Eric considers it a crime to serve this without vanilla ice cream, and I tend to agree. Treat yoself right. Drizzle on some Salted Caramel Sauce for a really decadent treat!
- Store the pie on the counter for up to 2 days, covered with plastic wrap or foil. After that transfer it to the fridge.
- See notes for detailed freezing instructions!