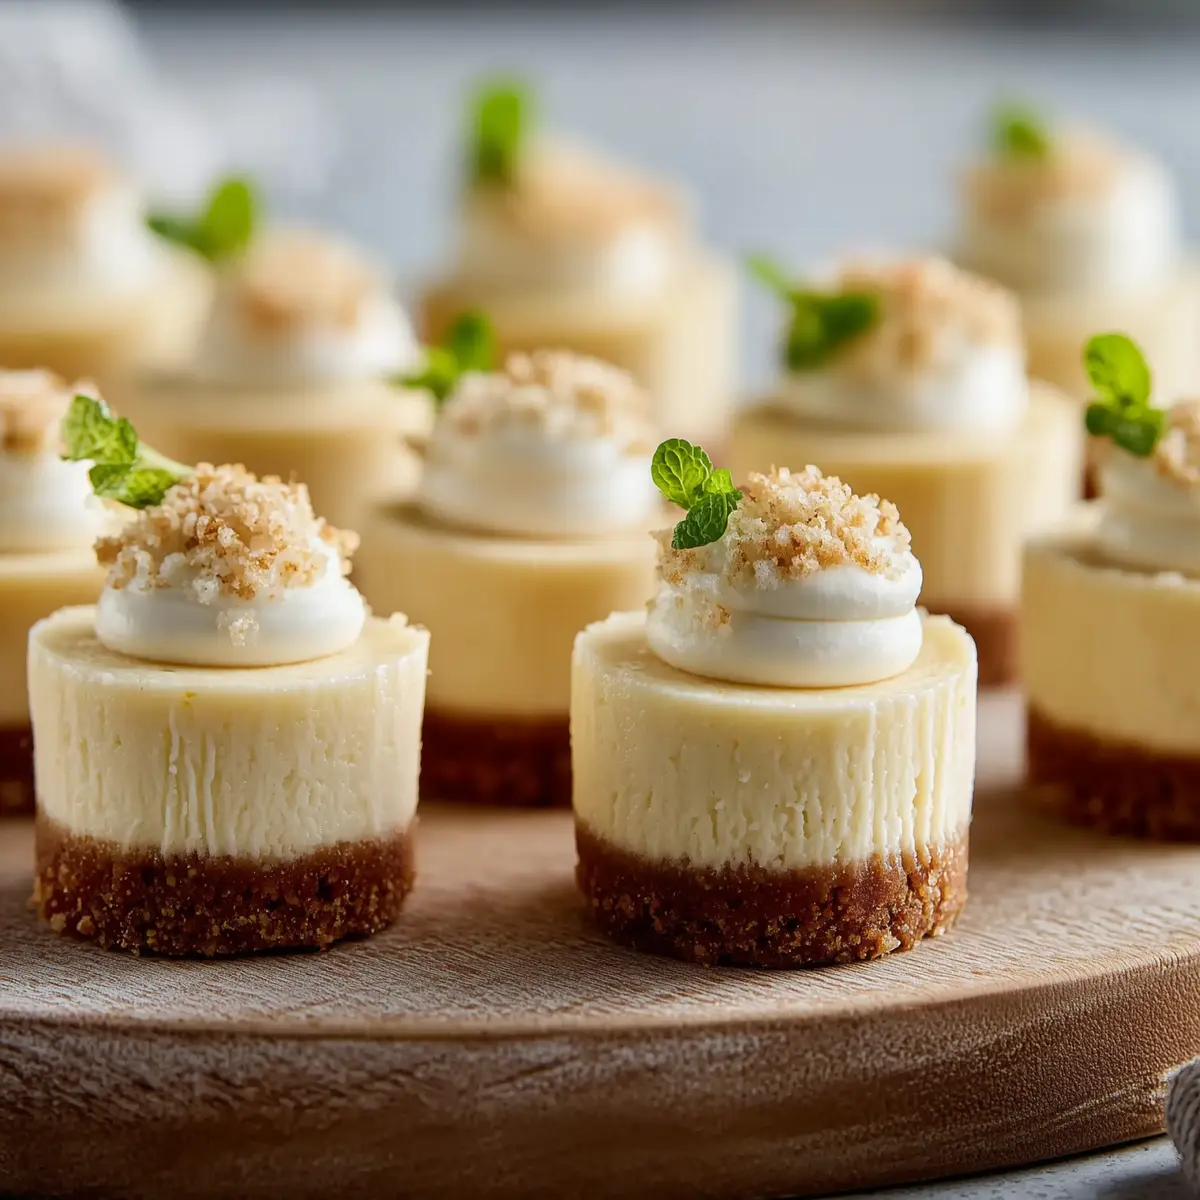
If you’ve ever stood in the kitchen, friends and family buzzing in the next room, and wanted something that’s both impressive and incredibly easy to serve—mini cheesecake bites are your new secret weapon. There’s something about their creamy centers, buttery crust, and playful toppings that makes each one disappear faster than you’d believe. Bite-sized desserts just have a way of making any gathering feel a little more festive, and these deliver both flavor and fun without any of the fuss of a classic cheesecake.
It’s the kind of dessert you whip up when your sweet tooth is calling (but you’re not in the mood for a baking marathon). Plus, these little cheesecakes give total creative freedom—mix and match fruits, chocolate, or cherries on top, and you’ve instantly got a tray that looks gorgeous and tastes even better.
Why These Mini Cheesecake Bites Are Always a Hit
When you need a dessert that matches any mood—elegant enough for a holiday, playful enough for a birthday, and easy enough for a Tuesday—mini cheesecake bites tick all the boxes. One of my favorite things is how people light up when they see a tray of these on the table. There’s no slicing, no sticky serving spoons, no awkward struggle to get the first piece out of the pan. Everyone just grabs their own perfectly portioned treat.
The creamy, velvety cheesecake contrasts with a buttery, crumbly crust in every bite, and each one is just begging for a unique topping. Hosting a crowd? You’re covered—these little gems are mess-free, portable, and they hold up beautifully if you make them ahead. You can even go no-bake if you want to keep it super simple. In a world of big desserts, sometimes smaller really is better—especially when it comes to flavor and fun.
All About the Ingredients for Mini Cheesecake Bites
Mini cheesecakes get their soul from quality ingredients. Here’s what brings it all together:
- graham cracker crumbs – make a classic, lightly sweet crust with subtle cinnamon and honey notes; digestive biscuits work well too for a slightly earthier base.
- Unsalted butter – binds the crust, adds richness, and helps it hold firm enough to pick up with fingers.
- Granulated sugar – goes into both the crust and the filling for an all-over mellow sweetness.
- Cream cheese – gives the bites that signature creamy tang and smooth texture; always soften it for the silkiest filling.
- Sour cream – lightens the filling and adds subtle tartness that balances all the sweet flavors.
- Vanilla extract – brings warm, floral sweetness to the cheesecake base.
- Lemon juice (optional) – just a splash brightens and lifts the other flavors without tasting too citrusy.
- Eggs – hold the filling together and give it that lush, custardy texture.
- Fresh strawberries – for bright, juicy topping; dice them small so they nestle perfectly on top of each bite.
- Fresh blueberries – add pop and color; wonderful for a summer twist or fruity medley.
- Cherry pie filling or fresh cherries – an easy, vibrant option that adds a sweet-tart finish.
- Chocolate shavings or drizzle – for something a little decadent, a touch of chocolate turns these into a party favorite.
See the recipe card below for the full list of ingredients and measurements.
Making Mini Cheesecake Bites Step by Step
Get ready for buttery crusts, creamy filling, and toppings that invite a little creativity at every turn. Here’s how to bring your mini cheesecake bites to life:
- Start with the crust: Combine graham cracker crumbs, sugar, and melted butter in a mixing bowl. Mix until you’ve got the texture of damp sand—every crumb glistening. Scoop a spoonful into each mini muffin liner, silicone mold, or tart pan. Use the back of a spoon or a small measuring cup to press it down tight and even; you’re aiming for a perfect little base that snaps instead of crumbling. Pop the pans in the fridge so the crusts set up while you move on.
- Whip up the filling: In a larger bowl, beat cream cheese and sugar together until everything is luxuriously smooth—think no lumps, no streaks, just creamy perfection. Add sour cream, vanilla, and (if you’re using it) a splash of lemon juice for a subtle tang. Mix just enough to blend in the eggs, adding them one at a time—overmixing here is the fast track to cracked cheesecakes, so keep it gentle and stop when everything looks even and silky.
- Assemble: Spoon the creamy cheesecake mixture onto the chilled crusts, nearly filling each mold to the top. Slide a tiny spatula or the back of a spoon over each one to even out the surface. Give the pan a little tap on the counter—this pushes out any sneaky air bubbles and helps the cheesecakes bake or chill with perfectly smooth tops.
- Bake or chill: If you’re baking, warm up the oven and let the cheesecakes bake just until the edges look set but the centers still have a little wobble. Let them cool completely before you even think about removing them from the pan; the chilling step in the fridge is what transforms them from pudding-like to sliceable, dreamy bites. Going no-bake? Skip the oven and head straight for the fridge—let them chill out until they’re nice and firm throughout.
- Finish and serve: Once set and cool, top each mini cheesecake with fresh strawberries, blueberries, a little cherry pie filling, or a drizzle of chocolate. Don’t overload them—just a touch makes them pretty and easy to pick up. These are best served chilled, when the filling is at its creamiest, but they’re still lovely if they sit out a bit and soften slightly. Handle them gently as you transfer (if any make it to the platter at all!).
Smart Tips for Foolproof Mini Cheesecake Bites
Mini cheesecake bites are surprisingly low-maintenance, but a few little tricks make them truly stellar. Don’t rush softening your cream cheese—let it lose its chill for the smoothest, lump-free batter. When it’s time to add the eggs, blend them in just until they disappear, not a whisk more. Extra mixing = extra air = cracks in your cheesecakes, and nobody wants that.
Make sure to tap the filled pans on the counter. It’s a tiny step that banishes pesky air bubbles and keeps the tops ultra-smooth. After baking (if you go the baked route), let the bites chill completely before removing them from the molds. Warm cheesecake is nearly impossible to handle and falls apart fast.
When it comes to toppings, less is more. A little fresh fruit or chocolate adds color and flavor without overpowering the creamy base. And if your kitchen is warm, keep the finished bites in the fridge until just before serving—they hold their shape and creaminess best this way. Oh, and if you’re prepping ahead, don’t top them until just before serving for freshest results.
Mini Cheesecake Bite Variations and Serving Ideas
What I love most about mini cheesecake bites is how easy they are to dress up or down for any mood or occasion. Swirl in a little raspberry or passion fruit puree before baking for a tart twist—or try adding a pinch of cinnamon or cardamom to the crust for warmth and complexity.
Get creative with fruit, too. Sliced kiwi, pomegranate seeds, or even candied orange peel bring bright color and unexpected flavor. If you’re leaning toward decadence, give a few of the bites a quick dip in melted chocolate or top them with caramel and a sprinkle of sea salt.
Serve these on a big platter for parties, nestle them into cupcake liners for lunchboxes, or dress them up with whipped cream and edible flowers for brunch or showers. Pair with espresso or a good cup of tea for a memorable treat. They’re also perfect for making ahead—just don’t add the fruit until serving so everything stays fresh and vibrant. If you want to freeze, leave off the toppings and wrap them tightly for best results.
FAQs about Mini Cheesecake Bites
Can I make mini cheesecake bites ahead of time?
Absolutely! Mini cheesecake bites are actually even better if they’ve had time to chill. You can make them a day or two in advance and store them in the fridge. Just add any fresh fruit or chocolate toppings right before serving for best flavor and texture.
How do I freeze mini cheesecake bites?
Mini cheesecake bites freeze beautifully. Once completely chilled and set, pop them out of their liners and arrange in a single layer on a baking sheet. Freeze until firm, then transfer to an airtight container or freezer bag. Thaw overnight in the fridge and add toppings when ready to serve.
Can I make these without eggs for a no-bake version?
Yes! For a no-bake take, simply skip the eggs and don’t bake the filling. The mixture will set up in the fridge, though it will be slightly softer in texture. Use sturdy cupcake liners or silicone molds so you can unmold them easily.
What are some fun topping ideas for mini cheesecake bites?
Besides classic fresh berries, try swirling on a bit of lemon curd, dolloping with caramel, sprinkling on toasted coconut, or adding crunchy chopped nuts. Around the holidays, candied cranberries or spiced compote give a festive touch—really, you can’t go wrong.
Mini cheesecake bites manage to pack creamy, tangy, and sweet into one irresistible little package—perfect for parties, lazy weekends, or just treating yourself after a long day. They make dessert feel effortless, but special, and let everyone have fun with their own toppings. Whether you’re baking for a crowd or just want a playful spin on a classic treat, these mini cheesecake bites offer instant enjoyment in every bite. Grab a few, share with friends (or keep them all to yourself), and let that little pop of cheesecake joy brighten your day.
More Delicious Recipes
- St. Patrick’s Day Chocolate Guinness Bundt Cake with Stout Glaze: This rich cake is perfect for celebrations, just like the mini cheesecake bites, and offers a decadent chocolate experience.
- Italian Cream Bombs: These delightful cream-filled pastries provide a similar creamy texture to cheesecakes, making them another great party treat.
- St. Patrick’s Day Brownie Trifle: Layered like the cheesecakes, this trifle combines rich flavors and looks stunning for any gathering.
Ingredients
Equipment
Method
- In a medium mixing bowl, combine graham cracker crumbs, granulated sugar, and melted butter. Stir until all crumbs are evenly coated and have the texture of damp sand. Press the mixture firmly into the bottoms of muffin liners, silicone molds, or mini tart pans using the back of a spoon or a small measuring cup. Chill the crust in the refrigerator for 10–15 minutes to set while you prepare the filling. This ensures a firm base that won’t crumble when serving.
- In a large mixing bowl, beat the softened cream cheese and sugar on medium speed until smooth and creamy. Add the sour cream, vanilla extract, and lemon juice, mixing until fully combined. Gradually add the eggs, one at a time, mixing just until incorporated. Avoid overmixing, as this can trap air and cause cracks in baked mini cheesecakes. The goal is a silky, lump-free filling with a light yet rich texture.
- Spoon the cheesecake filling evenly over the chilled crusts, filling each mold nearly to the top. Smooth the surface using a small spatula or the back of a spoon. Gently tap the molds on the counter to release any trapped air bubbles, helping the cheesecake set evenly and maintain a smooth top.
- For baked mini cheesecake bites, preheat the oven to 325°F (160°C) and bake for 18–20 minutes. The edges should be set, but the centers remain slightly soft. Let the bites cool completely at room temperature, then refrigerate for at least two hours. For no-bake mini cheesecake bites, skip the oven and place the filled molds directly in the refrigerator for at least two hours until firm.
- Once the mini cheesecakes are chilled and set, top them with your choice of fresh fruit, cherry pie filling, chocolate drizzle, or other garnishes. Keep toppings light to maintain the elegance and bite-sized nature of each piece. Serve chilled for the creamiest texture, or slightly softened for a melt-in-your-mouth experience. Gentle handling ensures that every mini cheesecake bite is perfectly shaped, creamy, and visually appealing.