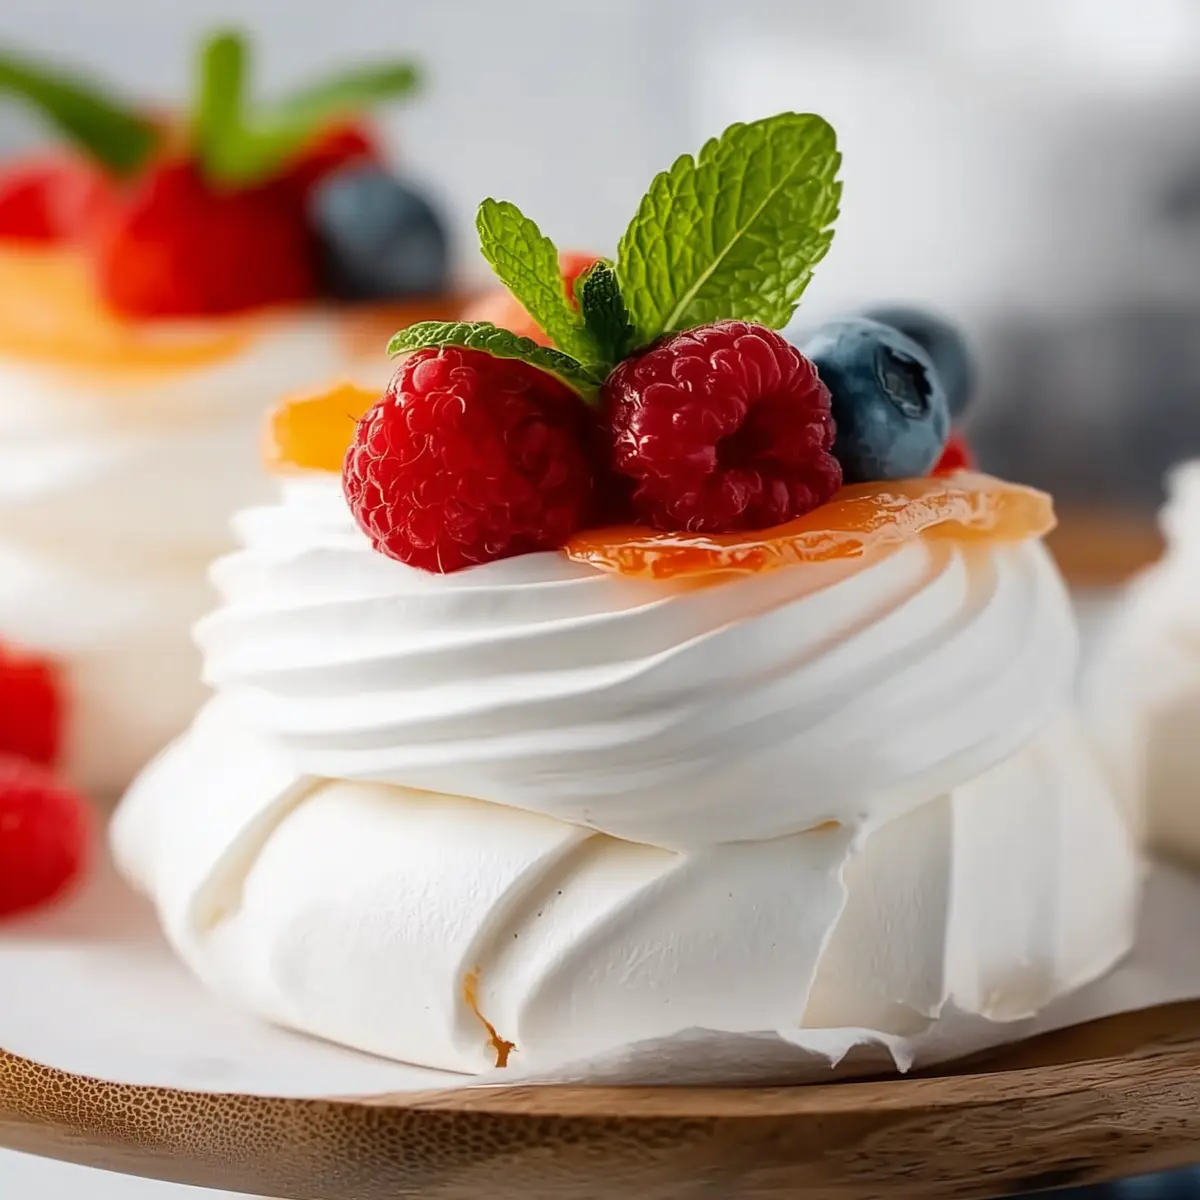
If you love desserts that are cloud-soft inside and crisp on the outside, you’re about to fall for Mini Pavlova Dessert. Each little nest is a showstopper—gorgeously billowy, light as air, and the ideal way to celebrate fresh fruit. There’s something magical about scooping up sweet, juicy berries over a pillow of whipped cream and shattering the delicate shell beneath.
The first time I made these pavlovas for a spring brunch, I remember the kitchen filling with vanilla-scented air and just the faintest crackle sound as I lifted them from the tray. These minis are pure elegance, yet so much easier to pull off than you’d expect.
Why Mini Pavlovas Are the Ultimate Dessert Experience
There’s just something inviting about desserts that mix crisp and gooey in every bite. Mini Pavlova Dessert is all about that contrast: a shell so thin it shatters tenderly under your fork, while the inside remains soft and marshmallowy. The whipped cream and fresh fruit set off the sugary meringue with their light, tangy freshness.
What makes this recipe special is how easy it feels to make a dessert that looks like it came straight from a patisserie window. It’s perfect for celebrations, cozy nights in, or as an elegant ending to a meal with friends. Plus, you can top each mini pavlova however you like—so everyone gets their own little masterpiece.
The Essential Tools for Flawless Mini Pavlovas
Here’s what you’ll want at your side for Mini Pavlova Dessert success:
- Large baking sheet – For spreading out and baking the pavlova nests.
- Parchment paper – Prevents sticking and makes clean-up a breeze.
- Stand mixer or handheld electric mixer – The best way to whip egg whites until they’re tall and glossy.
- Spatula – For gently folding in the flavorings and cornstarch without deflating the meringue.
- 1M star piping tip and piping bag – Creates that beautiful, swirled nest look (or you can use a spoon for a rustic style).
- Spoon – To gently indent the centers of each nest (perfect for the whipped cream and fruit).
- Mixing bowl (cold for cream) – For whipping up the dreamiest, fluffiest whipped cream possible.
If you don’t have a piping bag or tip, just mound the meringue and shape with the back of a spoon. They’ll taste every bit as wonderful.
Every Ingredient in Mini Pavlova Dessert Matters
- Large egg whites (room temperature) – The building blocks for those impossibly crisp and airy meringues.
- sugar – Sweetens and stabilizes the meringue, creating that classic shiny finish and light crunch.
- Lemon juice – Adds subtle brightness and helps the egg whites whip up stable and firm.
- Vanilla extract – Lends a warm, comforting flavor to your pavlova base.
- Cornstarch – The secret to a tender marshmallow center (don’t skip this—it’s vital for perfect texture).
- Heavy whipping cream (very cold) – Whips up luscious and thick for a dreamy topping.
- Powdered sugar – Sweetens and stabilizes the whipped cream, making it silky smooth.
- Fresh fruit (blueberries, raspberries, sliced strawberries, sliced peaches, kiwi, etc.) – Brings a burst of color, sweetness, and slight tartness to each bite.
- Mint leaves (optional, for garnish) – A fresh, green accent that lifts the flavor and makes your minis pop.
See the recipe card below for the full list of ingredients and measurements.
Step-by-Step: How to Get That Crisp Outside and Marshmallow Center
- Preheat and prep: Set your oven to 93°C (200°F). Line a large baking sheet with parchment paper to prevent any sticking.
- Whip those egg whites: In a stand mixer or with a hand electric mixer, whip the egg whites on high about 1 minute—until you see soft peaks forming. Gradually add in the sugar, just 1 tablespoon at a time, while still mixing on high. This slow addition is key! Continue whipping for about 10 minutes, until you have stiff peaks that are glossy and smooth. The mixture should hold peaks and look shiny.
- Fold in the flavor: With a spatula, quickly fold in the lemon juice and vanilla extract. Then gently fold in the cornstarch, mixing just until everything is blended. Don’t overmix.
- Pipe your nests: Fill a piping bag fitted with a 1M star tip (or simply use a spoon) and pipe 7.5–9 cm (3–3.5 inch) circles onto your parchment, shaping each into a little nest. Use a spoon to indent the center—this will cradle your cream and fruit later.
- Bake gently: Slide the sheet into your preheated oven and bake for 1 hour 15 minutes. Don’t peek or open the oven! When time’s up, turn off the oven and let the pavlovas cool completely right there (about 3–4 hours). This slow, undisturbed cooling ensures a crisp shell with a marshmallowy middle.
- Whip your cream: In a chilled bowl, beat the very cold heavy whipping cream with the powdered sugar for 2–2.5 minutes, until thickened and spreadable. Smooth, pillowy peaks are what you’re after.
- Assemble: Once the nests are cool and dry to the touch (outside should tap crisp, inside marshmallow-soft), pipe or spoon whipped cream into the center of each. Top with a beautiful mix of your favorite fresh fruit, and add a mint leaf if you’re feeling a little extra.
- Serve: Enjoy your mini pavlovas within 3 hours for that perfect textural contrast.
Mini Pavlova Tips, Troubleshooting, and Easy Fixes
Even the best bakers get tripped up by meringue once in a while. Here’s how to sidestep the usual pitfalls:
- Egg Whites Must Be Clean: Even a drop of yolk will prevent your whites from whipping properly. Use a clean, dry bowl every time.
- Sugar Must Dissolve: Adding sugar gradually is crucial. If your meringue isn’t glossy or feels grainy, beat longer to dissolve every bit.
- Don’t Overmix at the End: Once you add the cornstarch and flavorings, fold gently. Overmixing can deflate your meringue and ruin the airy texture.
- Avoid Humid Days: Meringues are notorious for absorbing moisture. Bake on dry days if you can—humidity can make the surface sticky or the shell collapse.
- Browning or Cracking: If your pavlovas brown instead of staying pale, your oven may run hot. If they crack, cooling them very slowly in the oven (door closed!) usually prevents this.
If your pavlovas come out chewy instead of crisp, bake longer at the same low temp or let them cool a bit longer. Soggy pavlovas can’t be revived, but they still taste great—with extra cream!
Pairings and Creative Ways to Dress Up Your Mini Pavlova
You can serve these mini pavlovas after a light meal, or as a centerpiece at tea time, brunch, or showers. They love being surrounded by:
- Fresh fruit platters, especially stone fruits and tropicals (think mango, kiwi, passion fruit).
- Berry sauces for an extra fruity punch.
- A sprinkle of lemon or lime zest for a tangy finish.
- Swirls of lemon curd or passion fruit pulp for added color and zing.
- Pair with espresso, iced tea, or even a sparkling white wine if you’re celebrating.
For variations, try:
- Swapping in a dairy-free whipped topping for a lactose-free version.
- Using honey or maple syrup-drizzled fruit for extra flavor.
- Crushing pistachios or hazelnuts over the top for a nutty crunch.
You can even turn this into a deconstructed pavlova “bar”—set out the nests, whipped cream, and a rainbow of toppings, and let everyone create their ideal mini pavlova.
FAQs about Mini Pavlova Dessert
Can Mini Pavlova Dessert be made ahead of time?
Yes, you can make the meringue nests up to a day in advance. Store them uncovered, in a dry area at room temperature. Only fill them with cream and fruit right before serving, as the meringue will start to soften once topped.
What substitutions work for Mini Pavlova Dessert?
If you don’t have lemon juice, a splash of white vinegar works as a stabilizer. For a dairy-free option, use coconut whipped cream. You can mix and match fruits based on what’s in season—just avoid anything too watery that might make the nests soggy.
How do I store leftover Mini Pavlova Dessert?
Mini pavlovas are best enjoyed fresh, but plain meringue nests can be kept in an airtight container at room temperature for up to 2 days. Once filled, they should be eaten within a few hours as the cream and fruit will cause the shells to lose their crispness.
Bring On the Celebration with Mini Pavlova Dessert
There’s nothing quite like the first bite of a Mini Pavlova Dessert—crisp edges giving way to a soft, marshmallowy center, all topped with luscious cream and bursting fresh fruit. Whether you’re making these for a party or treating yourself on a quiet afternoon, this dessert feels like a little celebration on a plate. Serve soon after assembly for the best mix of textures, and enjoy every sweet, airy mouthful.
More Delicious Recipes
- St. Patrick’s Day Chocolate Guinness Bundt Cake with Stout Glaze: This rich and indulgent cake pairs beautifully with whipped cream and seasonal fruits, making it a delightful dessert option.
- Vanilla Bean St. Patrick’s Day Cookies: These cookies add a sweet touch to any celebration and can be enjoyed alongside your mini pavlovas for a festive spread.
- Italian Cream Bombs: Filled with creamy goodness, these treats offer a contrast in texture similar to pavlovas, making them a great pairing for your dessert table.
Mini Pavlova Dessert Recipe
Ingredients
Equipment
Method
- Preheat your oven to 200°F. Line a large baking sheet with parchment paper.
- Using a stand mixer or handheld electric mixer, beat the egg whites on high speed for about 1 minute until soft peaks form. With the mixer still on, gradually add in the sugar, 1 tbsp at a time, and beat 10 minutes on high speed, or until stiff peaks form. It will be smooth and glossy.
- Using a spatula, quickly fold in the lemon juice and vanilla extract, then fold in the cornstarch and gently mix until well blended.
- Pipe meringue into 3 to 3½-inch wide nests onto the parchment paper using a 1M Star tip. Indent the center with a spoon to allow room for toppings.
- Bake for 1 hour and 15 minutes, then turn the oven off and without opening the door, let meringue sit in the oven until completely cooled, about 3-4 hours. (The outsides will be dry and crisp to the tap and a very pale cream-colored, and insides will still be marshmallow soft.)
- Transfer the pavlova with the parchment paper onto the counter for assembly.
- To make the whipping cream: beat cold whipping cream with 2 tbsp powdered sugar in a cold bowl for 2-2½ minutes or until whipped and spreadable.
- Once pavlova are completely cool, pipe some of the whipped cream in the indentation and top with a little fresh fruit.
- Serve and enjoy within 3 hours.