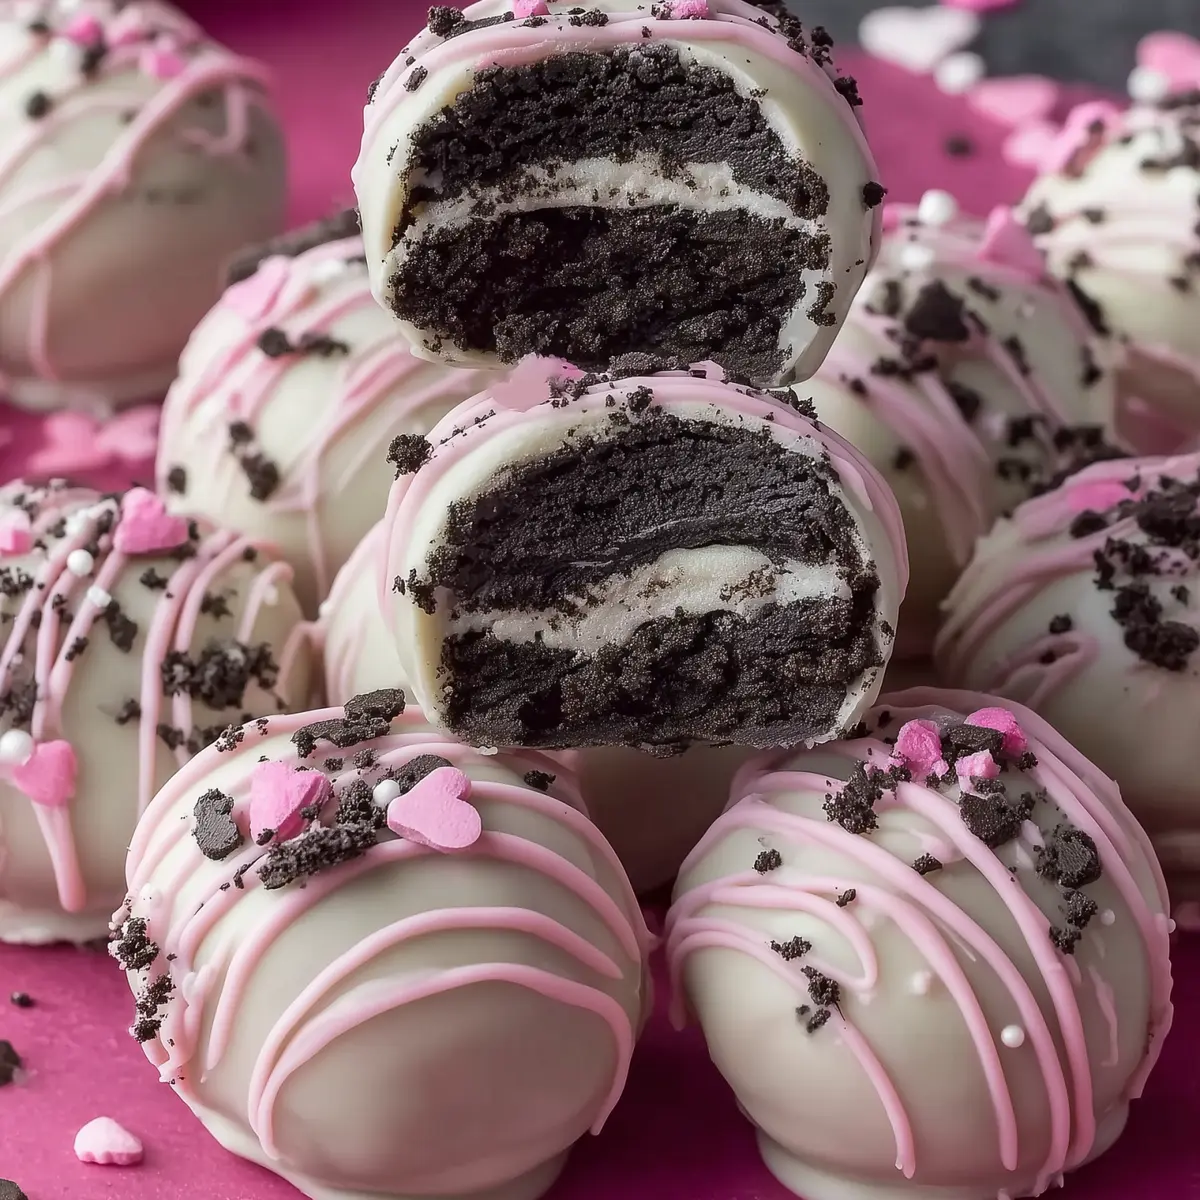
If you’ve ever stared down a last-minute holiday and thought, “I need a decadent treat that won’t destroy my kitchen or my sanity,” you’re not alone. No-Bake Oreo Balls for Valentine’s Day are what I reach for when dessert needs to be both showstopping and zero-stress. The hardest part? Not eating half the batch before they even get their chocolate shell.
Chocolate melts on the stove, sweet crème scent in the air, and a little sprinkle trail on the counter—this is the kind of hands-on, low-maintenance recipe built for a cozy Valentine’s weeknight or a baking project with friends. Rich, creamy centers meet dreamy chocolate coating for the ultimate bite-sized indulgence.
Easy Valentine Treats in Minutes
Whether you’re surprising a sweetheart, prepping a classroom party, or simply treating yourself, No-Bake Oreo Balls for Valentine’s Day hit all the sweet spots. They’re crazy easy—even if you only have a basic kitchen setup, you can pull these off without breaking a sweat.
The magic is in that no-bake shortcut: velvety, chocolate-filled centers with a crisp shell. The best part? You can get the kids or your friends involved for a fun, slightly messy dessert assembly line. These bite-sized truffles look festive with a handful of sprinkles and are always a hit, no matter how simple or over-the-top you go with the decorations.
No long wait for cooling, no heating up the oven—just the rewarding process of crushing, mixing, rolling, and dunking in silky chocolate. Pure satisfaction, minus the kitchen chaos.
The Sweet Core: Key Ingredients for No-Bake Oreo Balls
Let’s break down what you actually need to make these impossibly creamy, chocolatey treats. Here’s what goes into classic no-bake Oreo truffles:
- – Oreo cookies: the iconic, crunchy chocolate sandwich treats that deliver that unmistakable cookies-and-cream flavor.
- – Cream cheese: softens the cookie crumbs into a rich, velvety filling that melts in your mouth.
- – Chocolate candy melts or chocolate chips: forms that glossy shell for bite and sweetness—choose dark, milk, or white depending on your vibe.
- – Valentine’s Day sprinkles: festive, colorful flair that sets these balls apart for the holiday (totally optional, but highly encouraged).
See the recipe card below for the full list of ingredients and measurements.
Switch It Up: Fun Ingredient Twists
If you’re missing something or want to customize your no-bake Oreo truffles, don’t sweat it! Try these swaps:
- Use any chocolate sandwich cookie in place of the classic Oreos—store brand, chocolate-dipped, or even a flavored version.
- Go dairy-free by trading regular cream cheese for a vegan or lactose-free alternative. Just be sure it’s nice and soft for easy mixing.
- White chocolate, dark chocolate, or even colorful candy melts all work as the outer shell. Pick what you love or make a mix for a dramatic platter.
- For toppings, mini chocolate chips, crushed freeze-dried berries, or pink edible glitter are fun ways to play up the Valentine’s Day vibe.
Creative Ingredient Swaps for Oreo Truffle Balls
No-Bake Oreo Balls for Valentine’s Day are super forgiving, so you can easily adjust to what’s in your cupboard or dietary needs. Can’t find classic chocolate sandwich cookies? Any rich chocolate cookie with a creamy center will get you almost the same gooey filling.
Have a favorite nut butter or allergy-friendly spread? Swirl a spoonful into the cream cheese mixture for a hint of peanut or almond flavor—just avoid anything too runny, or the balls won’t set as well. If you want a grown-up twist, a drop of espresso powder or a pinch of sea salt in the mix takes things from kid-friendly to dinner party worthy.
You can even roll the finished truffles in cocoa powder or colored sugar instead of dunking them in chocolate if you’re after a lighter or extra-crispy exterior.
How to Make No-Bake Oreo Balls for Valentine’s Day, Step by Step
Whipping up these no-bake Oreo truffles is a seriously satisfying process. Here’s how to get those perfect creamy centers and snappy chocolate shells without any stress:
- Crush the cookies until they turn into fine, sandy crumbs—either in a food processor or by smashing them in a zip-top bag with a rolling pin. The goal is no big lumps.
- Combine the cookie crumbs with the softened cream cheese in a mixing bowl. Work the two together until you’ve got a smooth, even dough with no visible streaks.
- Scoop out portions of the dough and use your hands to roll them gently into balls. Place each on a parchment-lined tray so nothing sticks.
- Chill the balls in the fridge or freezer until they’re nice and firm—this step helps them hold their shape for dipping and keeps the filling extra creamy.
- Melt your chocolate or candy melts in the microwave or over a double boiler just until smooth and glossy. Stir frequently so nothing scorches or clumps.
- Using forks or a dipping tool, dunk each cold Oreo ball in chocolate, turning to coat all sides. Set them right back onto the parchment as you finish each one.
- While the chocolate is still soft, shower the tops with sprinkles, drizzle with extra chocolate, or add any festive toppers you like. Get creative—there’s no wrong way.
- Let the chocolate set up at room temp, or pop the tray back in the fridge for a quick chill. Once firm, they’re ready to eat (and hard to resist).
No-Stress Tips for Perfect Oreo Truffles Every Time
Don’t worry if your kitchen isn’t Instagram-worthy—these no-bake Oreo balls are incredibly forgiving, even if the chocolate isn’t perfectly smooth or your drizzles zigzag. Here’s what I’ve learned after dozens of batches:
- Make sure the cream cheese is truly soft—this helps it blend seamlessly into the cookie crumbs, so there’s no chunkiness.
- Chill the formed balls until they’re really firm. If they’re too soft, they’ll slip off your fork during dipping and can get messy.
- Keep your melted chocolate fluid by microwaving it in intervals or adding a drop of neutral oil if it feels thick.
- Use two forks or a dedicated dipping tool for a cleaner chocolate coating. Let any excess drip off before placing them on the tray.
- If decorating with sprinkles or other toppings, do it right after dipping, while the chocolate’s wet for the best stick.
Store extra Oreo truffles in an airtight container in the fridge for a few days—they’ll stay rich and creamy. If you want to get ahead, make the centers ahead of time and freeze them, then dip and decorate just before serving.
Pairing Ideas and Ways to Switch Things Up
No-Bake Oreo Balls for Valentine’s Day don’t need much to shine, but they go especially well alongside a creamy latte, a mug of hot chocolate, or a glass of bubbly on date night. For a dessert board, pair them with fresh berries, salted pretzels, or mini raspberry tarts for a playful sweet-and-salty mix.
Want to change up the flavor profile? Peppermint extract can make them wintery, orange zest brightens up the filling, or a hint of cinnamon brings cozy warmth. If you’re serving a crowd, try making half with white chocolate and half with dark for a two-tone platter.
Planning ahead? The naked (undipped) balls freeze perfectly—just thaw a little before dunking them in chocolate and decorating. That way, you always have a stash of Oreo truffle potential ready to turn any day into a mini celebration.
FAQs about No-Bake Oreo Balls for Valentine’s Day
Can I make No-Bake Oreo Balls ahead of Valentine’s Day?
Absolutely, the centers can be prepared days or even weeks ahead—just store them in the freezer. Dip in chocolate the day you want to serve, and they’ll taste fresh and festive.
How long do these Oreo balls last after making?
Once dipped and decorated, these truffles keep well in the fridge for several days. Just store them in a sealed container so they don’t dry out or pick up fridge smells.
Do I need a food processor to crush the cookies?
Nope, a sturdy zip-top bag and a rolling pin (or a heavy glass) can crush the cookies just fine. It’s a great hands-on way for kids or helpers to participate.
How do I prevent the chocolate from seizing or clumping?
Melt the chocolate gently—go low and slow in the microwave, stirring often, or use a double boiler. If it thickens, add a tiny bit of neutral oil for a silkier dip.
Why You’ll Make This No-Bake Oreo Balls for Valentine’s Day Again
There’s something about No-Bake Oreo Balls for Valentine’s Day that guarantees they’ll show up on your dessert table again. With their rich filling, crackly chocolate shell, and total ease—plus endless ways to decorate and adapt—it’s a nearly foolproof treat for every celebration or craving.
Next time you need a sweet fix or want to add a little homemade love to the holiday, you know where to start. These truffles aren’t just for Valentine’s—they’re the sort of recipe that quietly becomes a tradition, one bite at a time.
More Relevant Recipes
- St. Patrick’s Day Chocolate Guinness Bundt Cake with Stout Glaze: This indulgent cake offers a rich chocolate experience similar to the creamy centers of no-bake Oreo balls.
- Italian Cream Bombs: These bite-sized treats are perfect for a sweet celebration, much like the delightful no-bake Oreo truffles.
- St. Patrick’s Day Brownie Trifle: A layered dessert that combines chocolate and cream, offering a similar rich flavor profile to the Oreo balls.
Ultimate No-Bake Oreo Balls for Valentine’s Day
Ingredients
Equipment
Method
- Place the Oreo cookies into a food processor and pulse until they form fine crumbs. Alternatively, crush them in a sealed bag using a rolling pin.
- Transfer the Oreo crumbs to a bowl, add the softened cream cheese, and mix until fully combined and smooth.
- Scoop portions of the mixture and roll into smooth balls. Place them on a parchment-lined baking sheet.
- Chill the Oreo balls in the refrigerator for at least 30 minutes or in the freezer for about 15 minutes.
- Melt the chocolate or candy coating according to package instructions, stirring until smooth.
- Dip each chilled Oreo ball into the melted chocolate, coating completely, then return to the parchment-lined tray.
- Immediately decorate with sprinkles or drizzle while the chocolate is still wet.
- Allow the chocolate to set at room temperature or chill for about 15 minutes until firm.