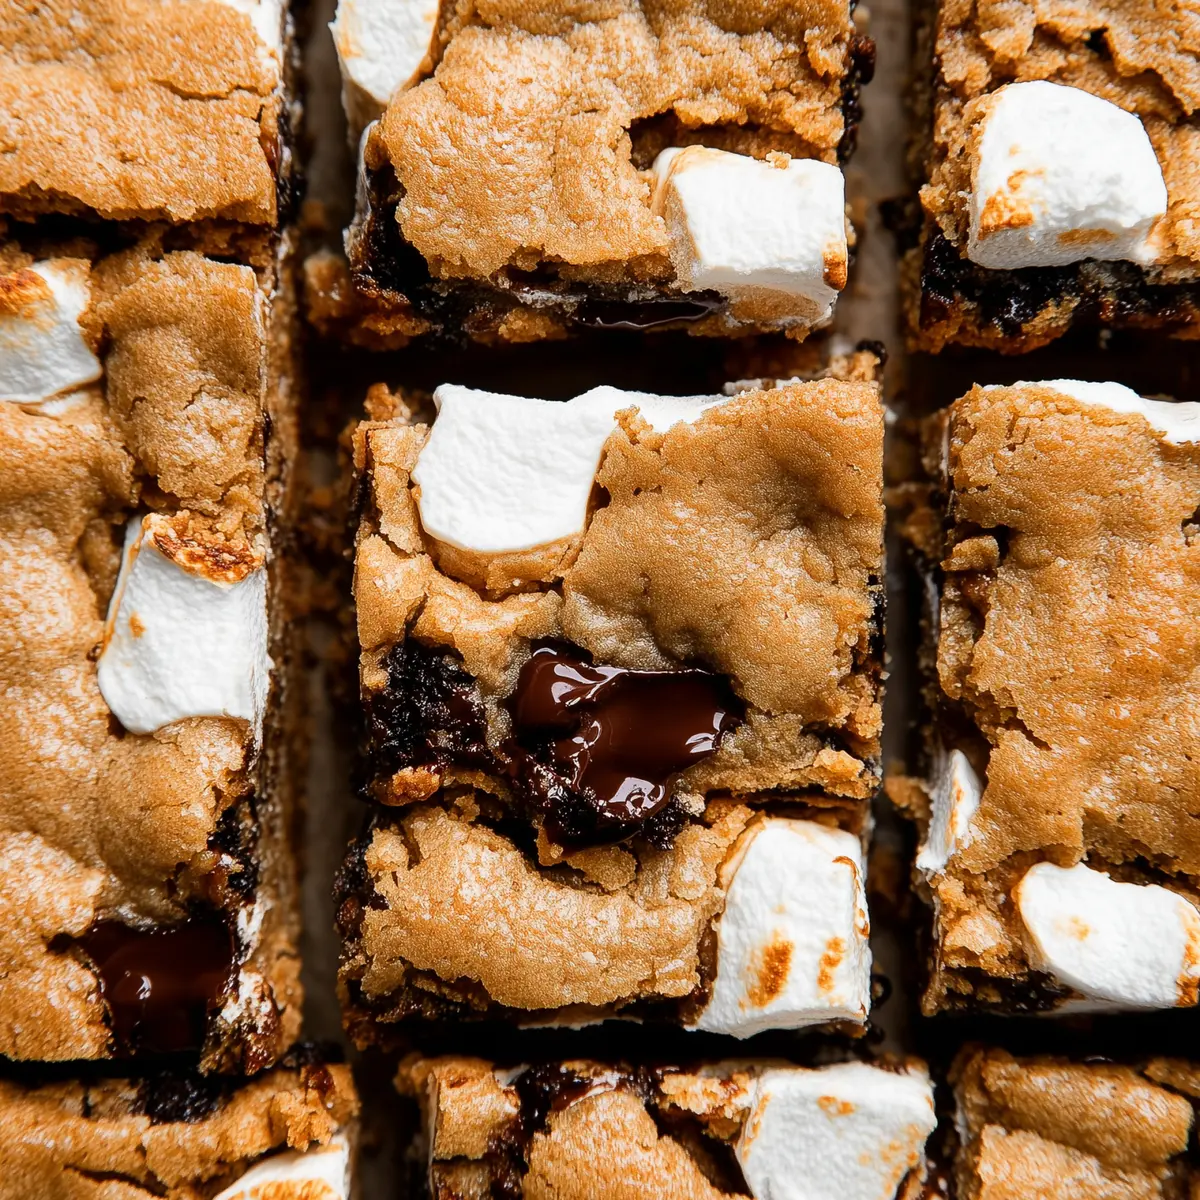
If you’ve ever wanted gooey, chocolatey, marshmallow goodness without building a campfire—or cleaning up the sticky disaster—these s’mores cookie bars are going to be your new go-to. Just one bite and you get that iconic combo of golden graham, melted chocolate, and creamy marshmallow sandwiched between buttery cookie layers. Forget sticky fingers and sliding chocolate; with this recipe, all the best bits of a classic s’more are baked right into every bite.
Pulling these out of the oven fills the kitchen with the rich aroma of toasted sugar and chocolate. I usually can’t resist sneaking an edge piece while they’re still a little warm and extra melty. Whether you’re making these for a crowd, a picnic, or just craving some nostalgia, these s’mores cookie bars check all the right boxes.
Why These S’mores Cookie Bars Will Become Your Favorite Treat
If you’re anything like me, you get sudden cravings for something rich, chewy, and a little bit nostalgic. S’mores cookie bars just scratch that itch every single time. They’re perfect for sharing at summer cookouts, cozy movie marathons, or even just sneaking from the pan while everyone else’s back is turned (guilty as charged).
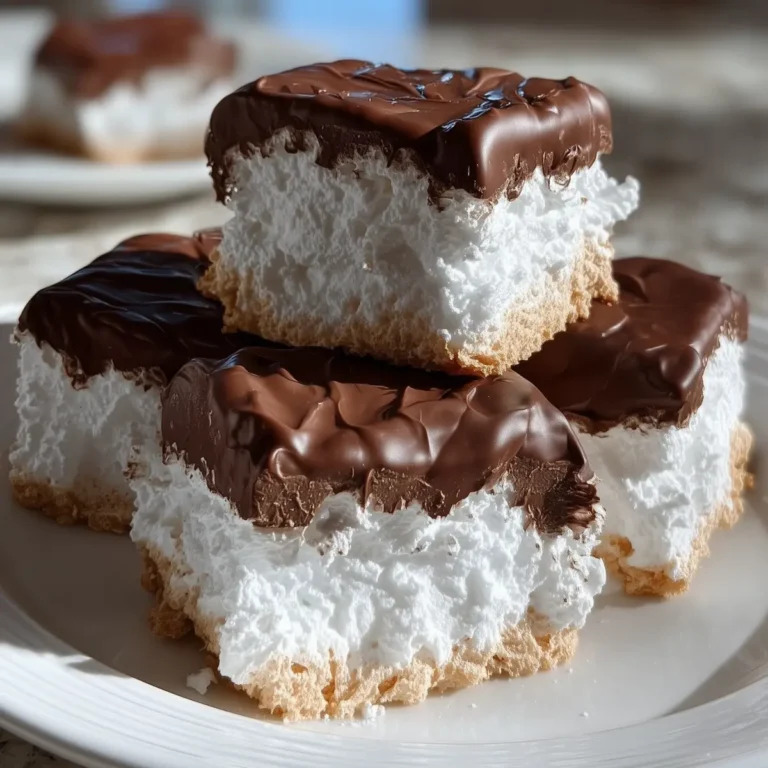
What makes these bars a standout is the way layers of graham cracker-infused cookie dough hug a thick stripe of gooey marshmallow crème and a generous helping of melted chocolate. Each bite gives you a hint of toastiness from the graham, chocolaty pockets, and sweet marshmallow, all with a buttery, soft cookie crumb. Unlike campfire s’mores, you won’t end up with half your dessert melted onto your hands and the other half in the coals—these bars keep it all together, literally.
Bonus: They’re way simpler than hauling out a fire pit or cleaning up a sticky roasting stick. You get everything you want in a classic s’more, but in a portable, party-friendly square. Kids love them. Grown-ups get hit by a wave of childhood memories. And honestly, they keep really well, so you can make them ahead for a special event or stow some away for late-night cravings.
Ingredients That Make S’mores Cookie Bars So Irresistible
Let’s take a quick stroll through what you’ll need for that ultimate s’mores cookie bar experience—no fancy stuff, just the good basics.
- butter – adds rich flavor and gives the cookie base its tender, melt-in-your-mouth texture. You’ll want it softened for easy creaming.
- Brown sugar – brings a deep, toffee-like sweetness and keeps everything moist and chewy. Light or dark both work, depending on how molasses-rich you want it.
- Egg – helps bind the dough and keeps the bars fluffy instead of crumbly.
- Vanilla extract – a splash of vanilla pulls together all the warm, sweet flavors and adds an extra bakery note.
- All-purpose flour – the structure and body for the cookie, holding all that gooeyness together.
- Graham cracker crumbs – this is the heart of s’mores flavor, giving the cookie layers their classic toasty-sweet bite. If you want extra crunch, leave a few bits a little larger when you crush them.
- Baking powder – helps the dough puff up just enough for thick, soft layers.
- Salt – a little salt heightens all the flavors and keeps the bars from being overly sweet.
- Semi-sweet chocolate chips – melt into pockets of chocolatey goodness, but feel free to swap in chopped chocolate for extra gooiness.
- Marshmallow creme (store-bought or homemade) – the gooey center that truly makes these “s’mores.” You can use “Fluff” or make your own for a slightly lighter texture.
See the recipe card below for the full list of ingredients and measurements.
Step-by-Step: How to Bake S’mores Cookie Bars
Let’s make it easy. Here’s how you build those layers and get golden, gooey s’mores cookie bars every time:
- Start by lining your pan with parchment paper. This makes lifting the bars out for slicing a breeze, and you’ll thank yourself later—no scraping required!
- Cream together the butter and brown sugar until it’s light, billowy, and just a touch paler than when you started. You’re looking for a soft, whipped texture; this is what gives the cookie base that beautiful chew.
- Mix in the egg and vanilla extract. The mixture might look a little broken or curdled at this point—no stress, it’ll all come together when you add the dry ingredients.
- In a separate bowl, whisk together the flour, graham cracker crumbs, baking powder, and salt. This way, you don’t end up with a mouthful of baking powder in one bite.
- Add your dry ingredients into the wet mix, blending until you have a thick, sticky dough. It should press together easily but feel soft and pliable.
- Press about two-thirds of the dough into the bottom of your prepared pan, creating an even, thin layer that stretches to the edges. It’s sticky, so use your hands—a little messy, a lot fun.
- Spread the marshmallow crème over that bottom layer. A small offset spatula (or the back of a spoon) is your friend here; take your time, it doesn’t need to be perfect. A few little gaps are totally fine.
- Sprinkle the chocolate chips in an even layer right on top of the marshmallow. The more, the merrier. Don’t be shy—every bite should get chocolate.
- With the remaining dough, flatten rough pieces between your palms and place them across the top. They’ll look patchy, with some chocolate or marshmallow peeking through, and that’s exactly what you want—those melty streaks make the finished bars extra tempting.
- Bake until the top is just turning golden brown and the kitchen smells like you’ve set up shop in a cookie bakery. The edges should puff a little and look set, but the center will be slightly soft (it’ll firm up as it cools).
- Let everything cool in the pan—this is the hardest step, but worth it for clean-cut bars. Use the parchment to lift and transfer the whole slab to a cutting board before slicing into squares.
Pro Tips for S’mores Cookie Bar Success
Want impossibly good s’mores cookie bars every time? A few little tweaks make all the difference:
- Make sure your butter is truly softened, not melted or cold. This helps it cream nicely with the sugar, which means fluffier cookie layers.
- Don’t overmix once the flour and graham crumbs are in. The less you work the dough at this point, the softer and more tender the bars will be.
- If spreading marshmallow crème feels impossible, try piping it with a large bag or using a lightly greased spatula. Little gaps or streaks are part of the magic—the marshmallow will melt into every little pocket.
- For those gorgeous, bakery-style squares, always let the bars cool completely before slicing. If you like a gooier middle, cut them a bit sooner and embrace the ooze.
- Double the batch and use a bigger pan if you’re serving a crowd; adjust the baking time as needed. The bars freeze surprisingly well, so you can stash extras for a rainy day (or unexpected cravings).
- Some bakers like to add pieces of chocolate bars on top or toast the marshmallow layer with a kitchen torch after baking for some extra s’mores drama—totally optional, but oh-so-fun.
Creative Variations and Serving Ideas
Here’s where you get to play and make these cookie bars fit whatever mood (or occasion) you’re feeling:
- Swap out the chocolate chips for milk chocolate chunks, chopped dark chocolate, or mini peanut butter cups for a fun twist.
- If you’re a fan of extra texture, add toasted nuts or sprinkle flaked sea salt over the top before baking.
- Use cookie cutters on cooled bars for fun shapes—especially for parties or holidays.
- For a more traditional s’more vibe, simply lay chocolate bar segments right on top of the marshmallow crème layer.
- Want them extra gooey? Double the marshmallow crème filling (your squares will be sticky and slightly messy, but isn’t that half the fun?).
- These bars make incredible ice cream sundaes: chop one into chunks and layer with a scoop of vanilla ice cream, a drizzle of chocolate sauce, and a few graham cracker crumbles.
- If you need them to travel, cut the cooled bars and wrap individually for easy lunchbox treats or road trip snacks.
FAQs about S’mores Cookie Bars
Can I freeze s’mores cookie bars?
Absolutely! Once cooled, cut the bars and wrap them tightly in plastic wrap or stash in an airtight container. They freeze beautifully for a month or so. Thaw at room temperature or give them a quick blast in the microwave for that fresh-from-the-oven taste.
What’s the best way to store s’mores cookie bars?
Keep them in an airtight container or wrap well with foil. They stay soft and chewy at room temperature for several days, thanks to the marshmallow crème. You can refrigerate to extend freshness, but let them come to room temp before eating for the best texture.
Can I use homemade marshmallow crème instead of store-bought?
Definitely—homemade marshmallow crème works great and adds a lighter, airier texture in the middle. Just be sure to use a thick enough layer so the gooey center doesn’t all melt away during baking.
How can I customize these s’mores cookie bars for holidays or parties?
Try mixing in festive sprinkles, using colored marshmallow crème, or swapping in seasonal chocolate (peppermint bark for winter, white chocolate for spring). You can also cut into themed shapes or drizzle with a bit of caramel for party flair.
If you want all the flavor of a bonfire night without the smoke and sticky mess, s’mores cookie bars deliver every time. Each bite has that irresistible combo of chewy cookie, toasty graham, pockets of chocolate, and ribbons of gooey marshmallow. Serve them with a tall glass of milk, a hot mug of cocoa, or just straight from the pan, and enjoy a classic treat that doesn’t need a special occasion to be memorable.
More Delicious Recipes
- St. Patrick’s Day Snack Board: This fun snack board is great for gatherings and offers delightful mix-ins, reminiscent of a s’mores spread.
- Vanilla Bean St. Patrick’s Day Cookies: These cookies feature a delightful sweetness similar to the cookie base in s’mores cookie bars.
- Italian Cream Bombs: These treat-filled desserts bring a rich, creamy texture that complements the gooeyness found in s’mores cookie bars.
S'mores Cookie Bars
Ingredients
Equipment
Method
- Preheat oven to 350°F (177°C). Line an 8-inch square baking pan or 9-inch square baking pan with parchment paper, leaving enough overhang on the sides to easily remove the bars when they have cooled. Set aside.
- In a large bowl using handheld or stand mixer fitted with a paddle attachment, cream the butter and brown sugar together on medium-high speed, about 3 minutes. Add the egg and vanilla extract and beat until combined. Scrape down the sides and up the bottom of the bowl as needed. Mixture may appear curdled and that’s ok.
- Whisk the flour, graham cracker crumbs, baking powder, and salt together in a medium bowl. Pour the flour mixture into the wet ingredients and then beat on medium speed until combined.
- Press/spread 2/3 of the graham cookie dough into prepared pan. It will be a thin layer and the dough is sticky, so use your hands if needed. Spread the marshmallow creme evenly on top. Layer chocolate chips evenly on top. Mold the remaining cookie dough into flat pieces and layer on top of the chocolate chips; some chocolate chips/marshmallow will be exposed.
- Bake the bars for 25-30 minutes or until the top is lightly golden brown. Remove from the oven and place the pan on a wire rack. Cool bars completely.
- Lift the bars out using the parchment paper overhang on the sides. Cut into squares.
- Cover and store leftover bars at room temperature for up to 1 week.