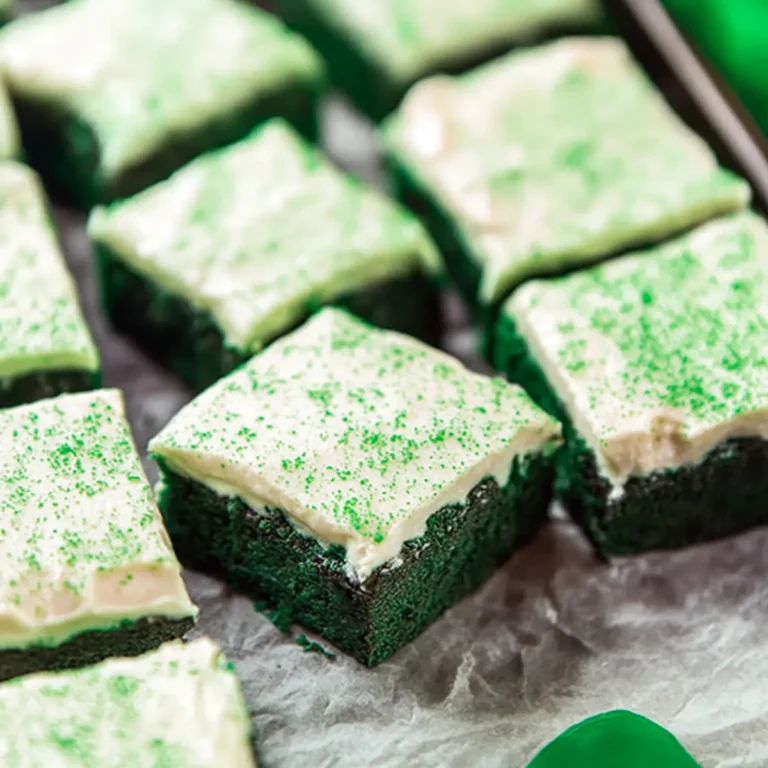
If you’ve ever stared at a tray of plain sugar cookies and wished for something with more character—something soft, vibrant, and absolutely packed with flavor—Vanilla Bean St. Patrick’s Day Cookies are your answer. These gorgeously speckled cookies bring out the real vanilla aroma in every bite, all while giving you a blank canvas to go wild with green-tinted buttercream, gold sprinkles, or whatever your celebration-loving heart desires.
I love how the kitchen fills with the scent of true vanilla and sweet butter when I make these. Rolling out dough, cutting shamrock shapes (or whatever you fancy), then swirling on creamy frosting is a hands-on, imperfect, totally fun process. If you’re in the mood for a St. Paddy’s treat that’s more than just festive—something with actual depth and personality—these are it.
Why Vanilla Bean St. Patrick’s Day Cookies Are a Must
These are not just another sugar cookie to crowd your St. Patrick’s Day table. The real charm of Vanilla Bean St. Patrick’s Day Cookies is buried right in the name: pure vanilla bean flavor.
You get soft-baked centers, faintly crisp edges, and that unmistakable aroma from flecks of vanilla running through each piece. It gives you all the nostalgia of classic sugar cookies, but with a grown-up upgrade—like if your favorite bakery met a leprechaun on a good day.
These cookies are roomy enough for all your creative moods. Shape them however you want, frost them wildly, or leave them plainly vanilla for a moment of simple luxury. They’re perfect for families, parties, cookie swaps, or quiet “treat yourself” nights with a cup of tea.
The Magic Inside: Vanilla Bean St. Patrick’s Day Cookies Ingredients
- flour: builds structure and ensures your cookies hold their shape—just don’t skip the rolling and chilling.
- Baking powder: gives the cookies that little lift and keeps them tender, not dense.
- Salt: sharpens the sweetness and brings out every note in the vanilla.
- Unsalted butter: makes everything rich, melt-in-your-mouth, and perfectly golden at the edges.
- Granulated sugar: sweetens the dough and creates a light crumb.
- Whole vanilla bean seeds: infuse the cookies and frosting with deep, natural vanilla speckles and unrivaled aroma.
- Egg: binds everything together and adds a gentle chew.
- Pure vanilla extract: backs up the beans with an extra hit of vanilla warmth.
- Confectioners’ sugar: the secret to velvety-soft buttercream.
- Heavy cream, half-and-half, or milk: brings the frosting to a creamy, spreadable consistency.
- Gel food coloring (optional): lets you paint your cookies in every shade of green—without watering down your frosting.
- Sprinkles (optional): because nothing says “celebration” like edible confetti.
See the recipe card below for the full list of ingredients and measurements.
Easy Swaps for Personal Touches
If you need to make a batch of vanilla sugar cookies fit everyone at the table, you’ve got room to play here. For dairy-free folks, try using plant-based butter and a splash of oat milk in the buttercream. No vanilla bean? Double up on the pure vanilla extract (though nothing quite matches those little black flecks).
Don’t have green food coloring? Try matcha powder for an earthy hue and subtle flavor twist. Not into buttercream? A quick glaze made with lemon juice and icing sugar works beautifully, or you can use royal icing for a crisp finish. And if you’re out of flour, a good gluten-free all-purpose blend usually holds up about the same in rolled cookies.
Making Vanilla Bean St. Patrick’s Day Cookies Like a Pro
Whether you’re a baking newbie or an old pro, these cookies strike the perfect balance between fancy and foolproof. Here’s how you’ll bring them to life:
- Whisk together the dry ingredients in a bowl—this little step ensures each bite bakes up even and balanced.
- Cream butter and sugar together until the mixture is both light and creamy. Add the seeds scraped from a fresh vanilla bean for a flavor boost you’ll notice right away.
- Beat in the egg and a splash of vanilla extract. Don’t forget to pause and scrape the bowl as you mix—those vanilla bits love to hide along the sides.
- Slowly combine your wet and dry mixtures, blending just until the dough comes together. The dough should feel soft and just a bit sticky; if it’s sticking too much, dust it with a touch more flour.
- Split and roll the dough between sheets of parchment or silicone mats, aiming for a uniform thickness. This helps them bake up evenly and shine with neat edges, no matter your cutter shape.
- Stack the rolled dough layers with parchment in between and chill—this is what keeps the cookies crisp-edged and picture-perfect, even when you use detailed cutters.
- Once the dough is thoroughly chilled, preheat your oven, cut out your favorite shapes, and re-roll any scraps for extra cookies. Don’t crowd them too close on the pan.
- Bake the cookies just until faintly golden at the edges. Let them cool before you even think about decorating. This step makes your buttercream game so much neater.
- For the buttercream, beat soft butter with more vanilla bean seeds. Blend in sifted confectioners’ sugar, add cream for that lush consistency, and a pinch of salt if you like balance.
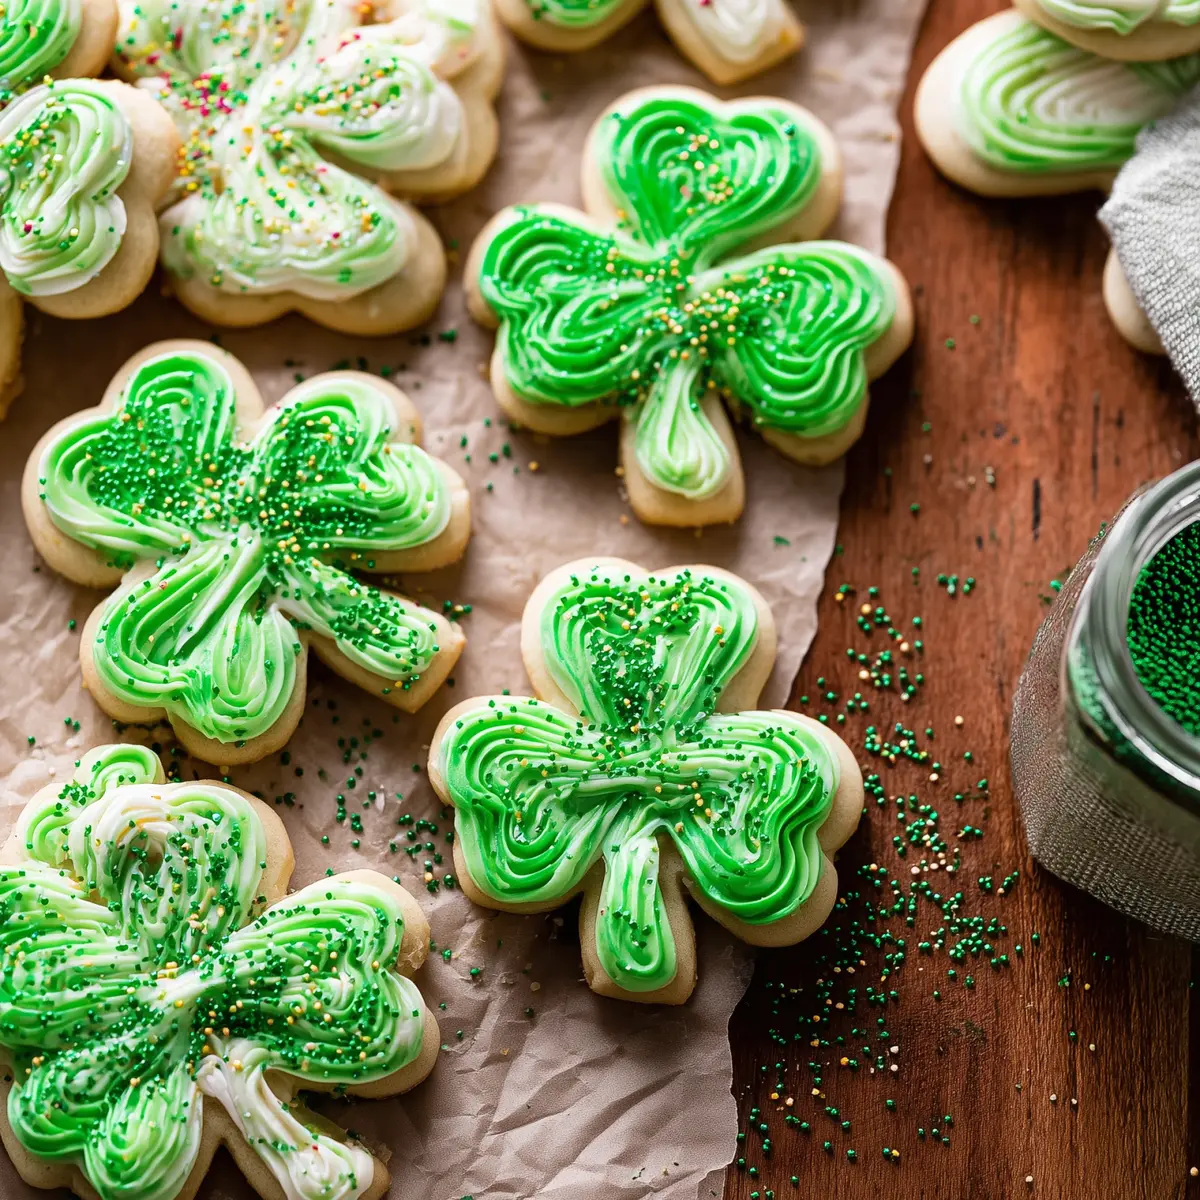
- Color your frosting if the mood strikes, spoon into piping bags (or use a spatula for casual swirls), and decorate—heart shapes for shamrocks, stripes, dots, or a generous shower of sprinkles.
Cookie-Baking Wisdom
A chill in the dough isn’t optional here. That time in the fridge guarantees clean shapes and cookies that don’t run into each other as they bake. If your dough seems too sticky, sprinkle in just a touch more flour—don’t go overboard or you’ll lose that dreamy softness.
When adding color to your buttercream, use a toothpick to add gel coloring bit by bit. It’s about control—a single drop can go a long way and keeps things vibrant without thinning the icing. If you want to pipe perfect shamrocks, tuck both tinted and plain frostings into the piping bag for a marbled look.
Store any decorated cookies in a single layer if you can. If you must stack them, lay parchment between layers and expect some gentle smushing—the buttercream stays soft. Unfrosted cookies are your make-ahead friend, keeping fresh for days in a container.
Delicious Pairings and Festive Variations
You can serve Vanilla Bean St. Patrick’s Day Cookies alongside Irish coffee or a mug of creamy milk for a little grown-up–meets–kid moment. These cookies also fit right in next to fruit platters, chocolate treats, or even as a part of a themed dessert board.
For a twist, try tinting your dough itself with natural cocoa powder, swap in citrus zest for a St. Patrick’s Day-meets-spring flavor, or go full-on gold with luster dust over green frosting. No time for piping? Dip cooled cookies in a simple glaze and shower with sprinkles for quick, colorful fun.
And if you’re planning ahead, stash the unbaked cookie shapes in the freezer. Bake fresh when the mood (or the next gathering) calls. These cookies never lose their appeal for gift-giving, classroom parties, or personal stash raiding.
FAQs about Vanilla Bean St. Patrick’s Day Cookies
Can I make Vanilla Bean St. Patrick’s Day Cookies ahead of time?
Yes, you can easily prepare these cookies ahead. Chilled dough keeps well in the fridge, and baked cookies (frosted or not) stay fresh for several days in a sealed container.
How do I get my cookies to hold their shape when baking?
The dough needs proper chilling to keep cut-out shapes crisp during baking. Chilling both before and after rolling prevents spreading and ensures sharp edges.
What’s the best substitute if I don’t have a vanilla bean?
You can use extra pure vanilla extract instead. Double the amount of extract for a richer vanilla flavor, though you’ll miss those beautiful vanilla bean specks.
Can I freeze these cookies?
Yes! Both the dough and the baked, unfrosted cookies freeze beautifully. Just layer with parchment for easy separation; frost after thawing for the freshest texture.
Bringing It All Together
Vanilla Bean St. Patrick’s Day Cookies are the kind of recipe you’ll find excuses to make beyond one holiday. The soft texture, real vanilla warmth, and playful decorating possibilities set them apart from ordinary sugar cookies.
Whether you shape them into shamrocks, leave them plain, or load them up with two-tone frosting, these cookies invite you to bake, taste, and share something a little extraordinary. There’s just something irresistible about cookies that look festive and deliver real, deep flavor in every bite.
Vanilla Bean St. Patrick's Day Cookies
Ingredients
Equipment
Method
- Whisk the flour, baking powder, and salt together in a medium bowl. Set aside.
- In a large bowl using a handheld or a stand mixer fitted with a paddle attachment, beat the butter and sugar together on high speed, about 3 minutes. (Here’s a helpful tutorial if you need guidance on how to cream butter and sugar.) Add the vanilla bean seeds and beat again until combined and butter is creamy, about 1-2 more minutes. Add the egg and vanilla extract and beat on high speed until combined, about 1 minute. Scrape down the sides and up the bottom of the bowl and beat again as needed to combine.
- Add the dry ingredients to the wet ingredients and beat on low speed until combined. Dough will be a bit soft. If the dough seems too soft and sticky for rolling, add 1 more Tablespoon of flour.
- Divide the dough into 2 equal portions. Place each portion on a piece of lightly floured parchment paper or a lightly floured silicone baking mat. With a lightly floured rolling pin, roll the dough out to about 1/4-inch thickness. Use more flour if the dough seems too sticky. The rolled-out dough can be any shape, as long as it is evenly 1/4-inch thick.
- Lightly dust one of the rolled-out doughs with flour. Place a piece of parchment on top. (This prevents sticking.) Place the 2nd rolled-out dough on top. Cover with plastic wrap or aluminum foil and then refrigerate for at least 1-2 hours and up to 2 days.
- Once chilled, preheat oven to 350°F (177°C). Line 2-3 large baking sheets with parchment paper or silicone baking mats. Carefully remove the top dough piece from the refrigerator. If it’s sticking to the bottom, run your hand under it to help remove it. Using a cookie cutter, cut the dough into shapes. Re-roll the remaining dough and continue cutting until all is used. Repeat with 2nd piece of dough. (Note: It doesn’t seem like a lot of dough, but you get a lot of cookies from the dough scraps you re-roll.)
- Arrange cookies on baking sheets 3 inches apart. Bake for 11-12 minutes or until lightly browned around the edges. If your oven has hot spots, rotate the baking sheet halfway through bake time. Allow cookies to cool on the baking sheet for 5 minutes and then transfer to a wire rack to cool completely before decorating.
- With a handheld or stand mixer fitted with a paddle attachment, beat the butter and vanilla bean seeds together on medium speed until butter is creamy, about 2 minutes. Add confectioners’ sugar, heavy cream, and vanilla extract. Beat on low speed for 30 seconds and then increase to medium-high speed and beat for 2 full minutes. Taste. Add a pinch of salt if frosting is too sweet. To color the frosting, divide the frosting between 2-3 bowls (or however many colors of frosting you want). Stir in 1-2 tiny drops of gel food coloring (or more, depending on your desired color).
- You can decorate the cookies with a knife, icing spatula, or use a piping bag and piping tip. Top with sprinkles, if desired. In the pictured cookies, I filled a piping bag with spoonfuls of both green and uncolored frosting and used Ateco 30 piping tip. Pipe hearts as the 3 leaves and a line as the stem.
- Frosting does not harden or crust very much, though you could gently stack 1 frosted cookie on top of another, but expect some slight squishing. Store frosted cookies covered at room temperature for up to 1 day or in the refrigerator for up to 1 week. Store unfrosted cookies covered at room temperature for up to 5 days or in the refrigerator for up to 1 week.